Get a Quote     (408) 943-4100               TrueNAS Discord      VendOp_Icon_15x15px   Commercial Support Toggle between Light and Dark mode

Replication Task Screens

  23 minute read.

Last Modified 2022-09-26 17:12 -0400

The Replication Task widget on the Data Protection screen lists replication tasks configured on the TrueNAS system. Replication tasks work with periodic snapshot tasks to complete the replication.
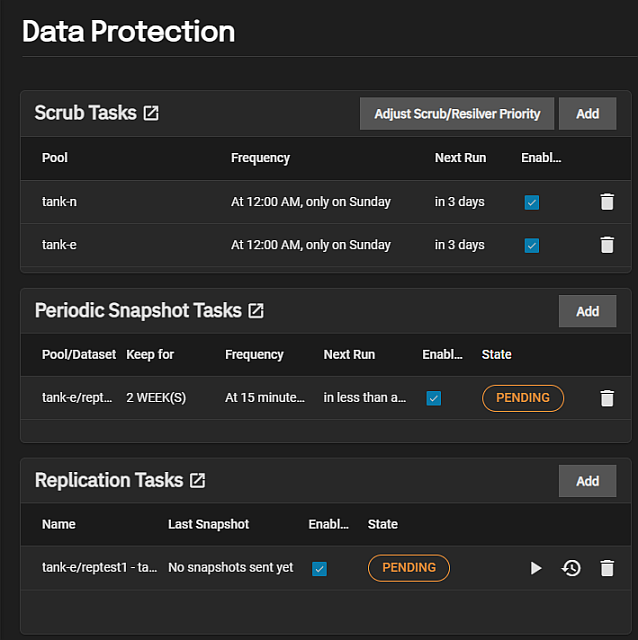
ReplicationAndPeriodicSnapshotTasksWidgets

The Replication Tasks widget displays No Replication Tasks configured before you add a task.

ReplicationTasksWidgetNoTasks

The Replication Task widget heading is a link that opens the Data Protection > Replications Tasks list view screen.

Add opens the Add Replication Task wizard.

Each replication task is a link to open the Edit Replication Task screen.

The widget displays the status of a task as PENDING, RUNNING, SUCCESS or FAILED. Click on the status to open a Logs window where you can see details on the task and download the log file.

The play_arrow Run Now icon opens a dialog.

The restore Restore icon to opens the Restore Replication Task window.

The delete Delete icon opens a delete confirmation dialog.

Configure SSH in TrueNAS before creating a remote replication task. This ensures that new snapshots are regularly available for replication.

Replication Tasks List Screen

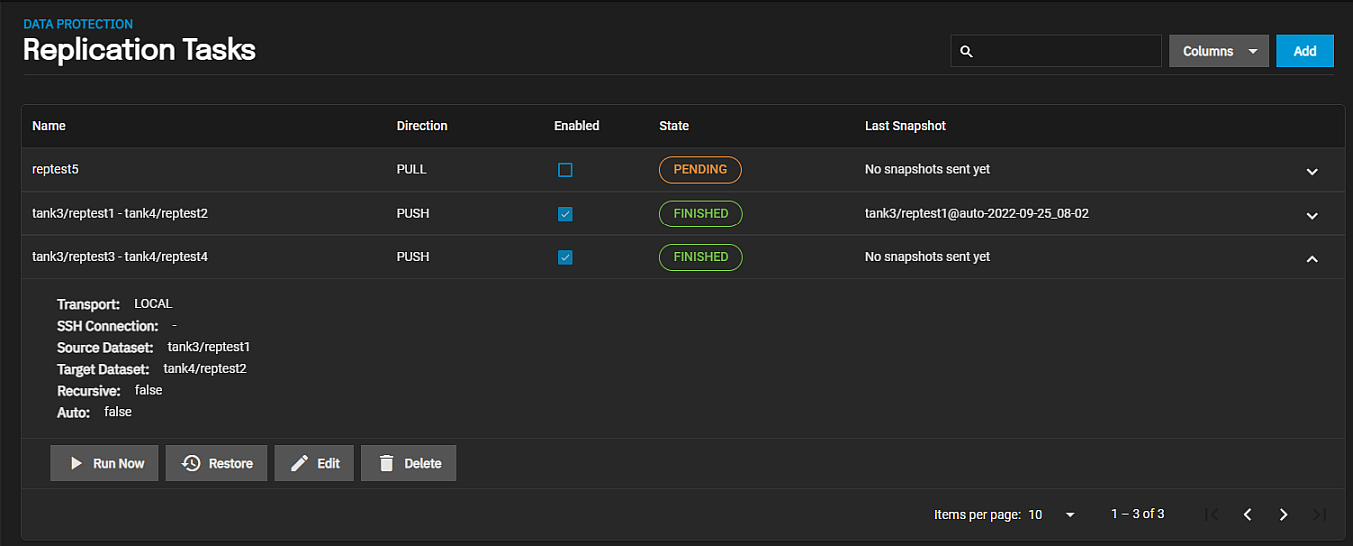
The Data Protection > Replications Tasks list view screen displays a the replication tasks configured on the system.

ReplicationTasksListScreen

Columns displays a list of option to customize the list view to add or remove information to the table. Options are Select All, Direction, Transport, SSH Connection, Source Dataset, Target Dataset, Recursive, Auto, Enabled, State, Last Snapshot, and Reset to Defaults.

If no tasks are configured on the system, this screen displays Not Replication Tasks and the option to Add Replication Tasks that opens the Add Replication Task wizard.
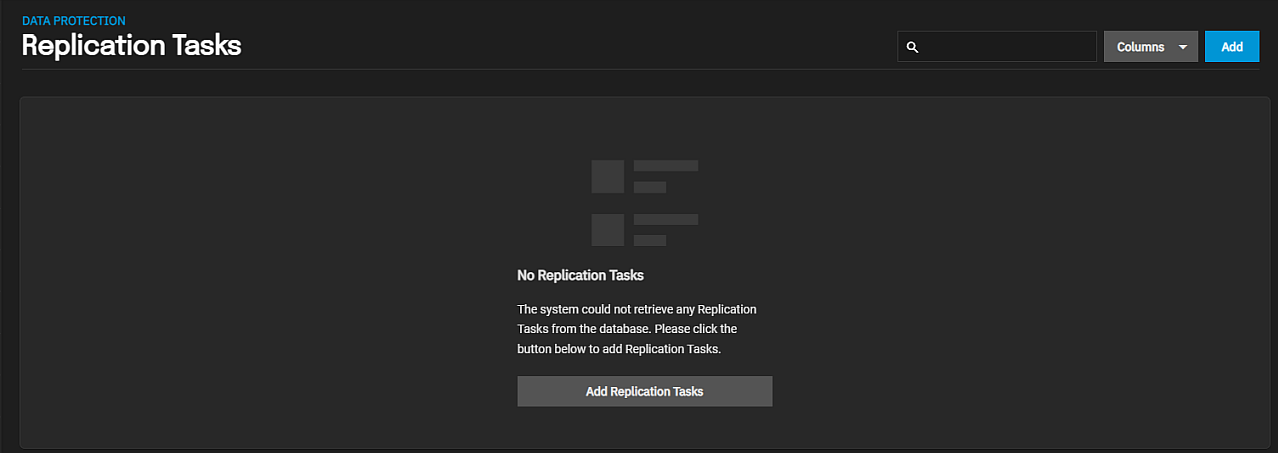
ReplicationTasksListNoTasks

Click anywhere on a task listed to expand the task and show details about that task and options to run, restore, edit or delete that task.

Replication Task Details

The details view of each replication task shows the Transport, SSH Connection, Source Dataset, Target Dataset, Recursive, and Auto settings.

ReplicationTaskDetails

The edit Edit button opens the Edit Replication Task screen.

Run Now Option

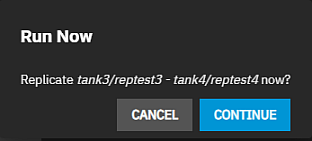
The play_arrow Run Now button opens a Run Now dialog.

ReplicationTaskRunNowDialog

Click CONTINUE to start the replication task.

Restore Option

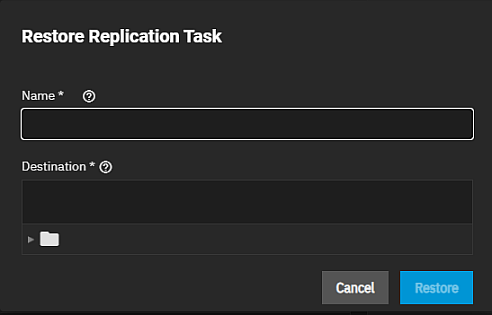
The restore Restore button opens the Restore Replication Task window.

RestoreReplicationTaskWindow

Enter a new name for the task and select the location to store the data, then click Restore. The system creates the new file and displays the task on both the widget and list screen with the PENDING status.

Delete Option

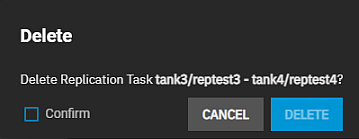
the delete Delete icon to open a delete confirmation dialog.

ReplicationTaskDeleteDialog

Click Confirm to activate Delete.

Add Replication Task Options

There are two ways to add a replication task, the wizard and the advanced creation screen. These two methods share many settings. The section below describe each setting. Some settings shared by the wizard and the advanced creation screen display more related setting options. These separate sections document the shared settings to make finding the information easier:

Add, or if no replication task exist, Add Replication Tasks open the wizard.

Add Replication Task Wizard

The wizard has two screens.

  • What and When settings specify the task name, data source and destinations, the type of replication (local or remote), transport options (SSH connection).
  • When setting specify when to run the task.

Advanced Replication Creation on the What and When screen opens the advanced replication creation screen.

What and When Wizard Screen

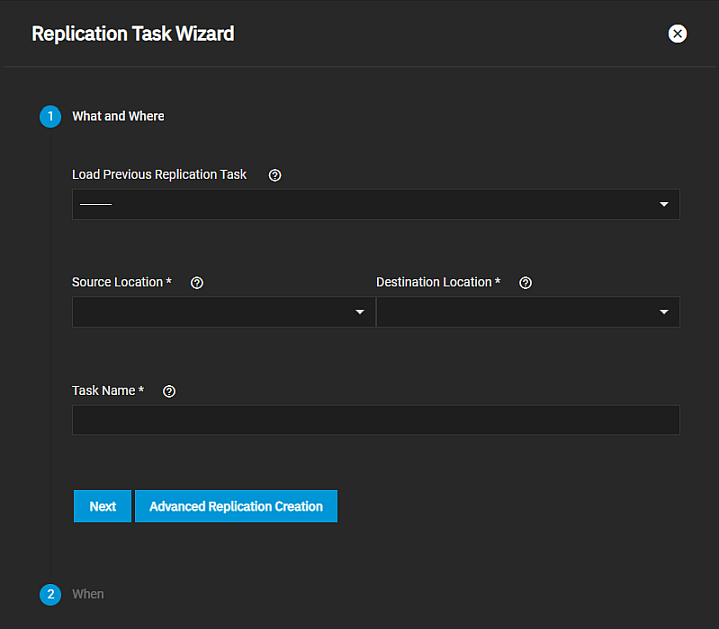
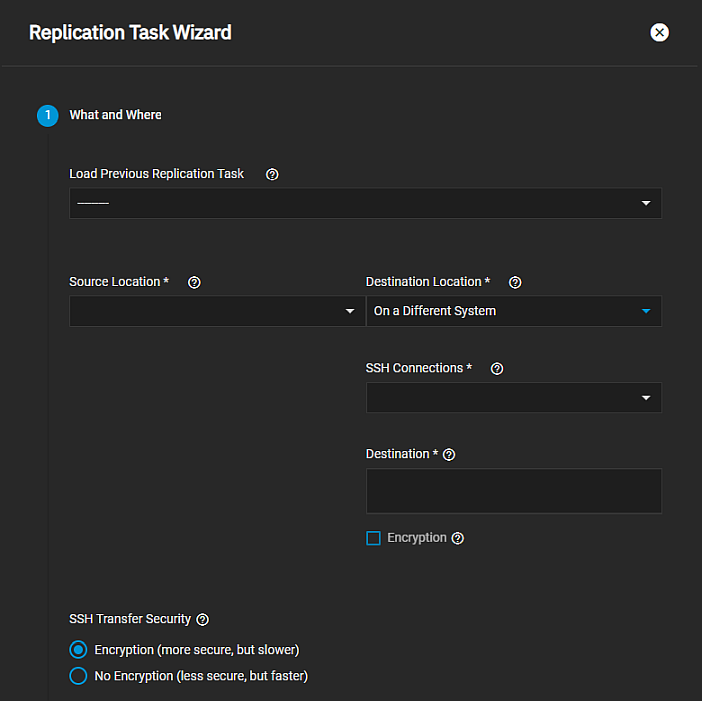
The What and When screen options specify a previous replication task, source and destination information and a name for the task. The Encryption option, used in both the replication task wizard and advanced creation screen, displays more options based on the selection made. The Source Location and Destination Location selections each display more options based on the selection made. The SSH Connection option displays for both source and destination if the location setting is On a Different System. The Also include snapshots with the name options display in both the wizard and advanced creation screen but different replicating snapshots settings related to naming result in them displaying.

ReplicationWizardWhatAndWhere

Setting Description
Load Previous Replication Task Use settings from a saved replication. Selecting an existing snapshot populates the Source Location, Destination Locations, Source, and Destination fields with the locations of the snapshots. It also populates the Task Name field at the bottom of the screen with a name that is a combination of the source-destination for the selected task.
Source Location Select the storage location for the original replicated snapshots. Options are On this System or On a Different System. If set to On a Different System, the Destination Location changes to On this System and the Destination field displays the path to the snapshot location. For more information on these setting options see Source Location Setting Options.
Destination Location Select the storage location for the replicated snapshots. ptions are On this System or On a Different System. If Source Location is set to On a Different System, the destination is automatically set to On this System and the Destination field displays.
Task Name Enter the name of this replication configuration. Populates with the source-destination names from the task selected in Load Previous Replication Tasks.

Source Location Setting Options

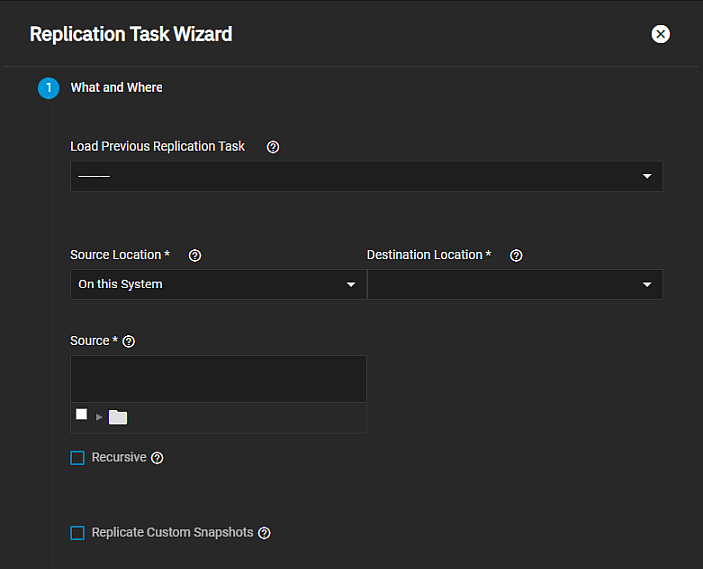
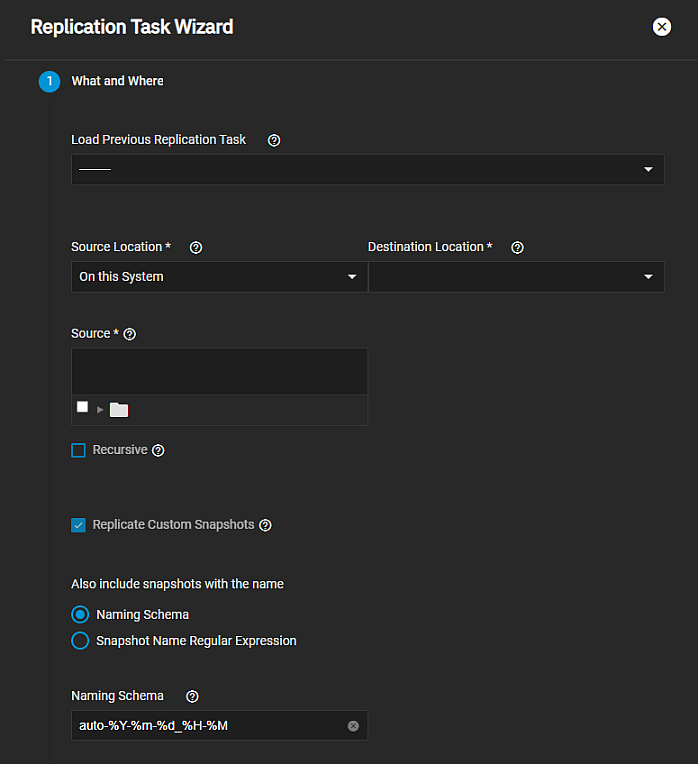
Wizard screen settings change based on the option selected in Source Location. Selecting On this system displays the Source field with the option to browse to the dataset location, and the Recursive option. Selecting On a Different System displays the Source and the Recursive options. It changes the Destination Location to On this System. It displays the Encryption option under Destination, adds SSH Connections to the source setting options, adds snapshot naming options, and the SSH Transfer Security options.

AddReplicationTaskSourceLocOnThisSystem

Setting Description
Source Required. Enter or use arrow_right to the left of folder/mnt and at each dataset to expand the dataset tree to browse to the dataset location that has snapshots to replicate. Click on the folder or checkbox to select the checkbox to the left of the dataset. To enter multiple datasets, enter a comma (,) after each path in the Source field and then select another dataset. Click the arrow_drop_down at the folder/mnt to collapse the dataset tree.
SSH Connection Select an existing SSH connection to a remote system or select Create New to open the Create SSH Connection window to configure a new SSH connection.
Recursive Select to also replicate all snapshots contained within the selected source dataset snapshots. Leave clear to only replicate the selected dataset snapshots.
Replicate Custom Snapshots Select to replicate snapshots that are not created by an automated snapshot task. Requires setting a naming schema for the custom snapshots. Displays the Also include snapshots with the name radio buttons and fields.

Destination Location Setting Options

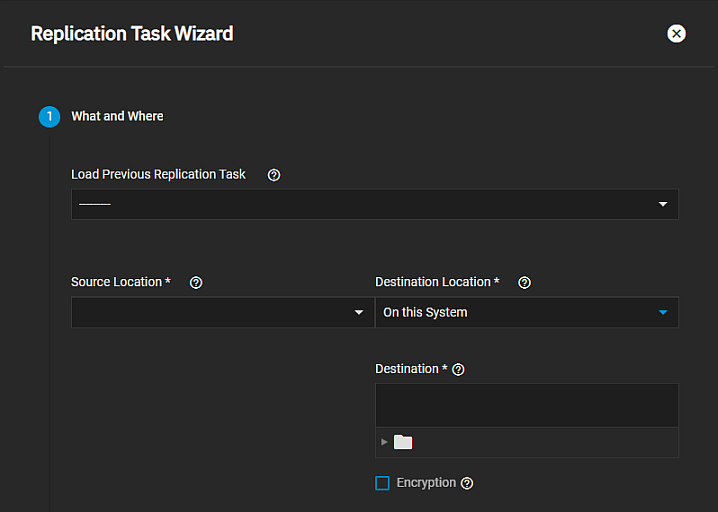
Wizard screen settings change based on the option selected in Destination Location and in the Source Location fields. Selecting On this System in Destination Location displays the Destination field with the option to browse to the dataset location and Encryption option under Destination. Selecting On a Different System displays the SSH Connections and SSH Transfer Security options.

AddReplicationTaskDestinationLocOnThisSystem

Setting Description
Destination Required. Enter or use arrow_right to the left of folder/mnt and at each dataset to expand the dataset tree to browse to the dataset location that has snapshots to replicate. Click on the folder or checkbox to select the checkbox to the left of the dataset. To enter multiple datasets, enter a comma (,) after each path in the Destination field and then select another dataset. Click the arrow_drop_down at the folder/mnt to collapse the dataset tree.
Encryption Select to use encryption when replicating data. For more information on all options see Encryption.

Encryption Setting Options

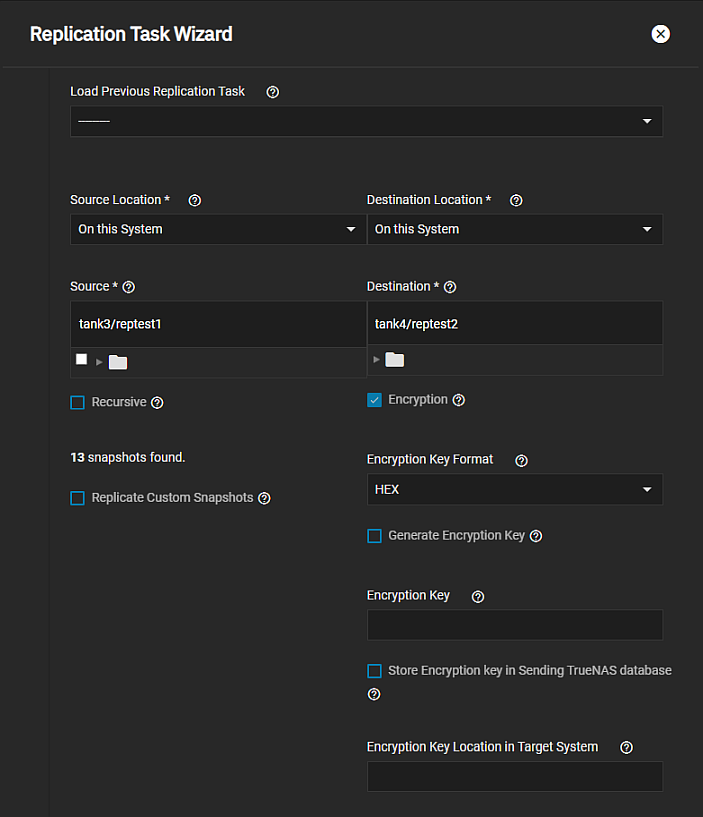
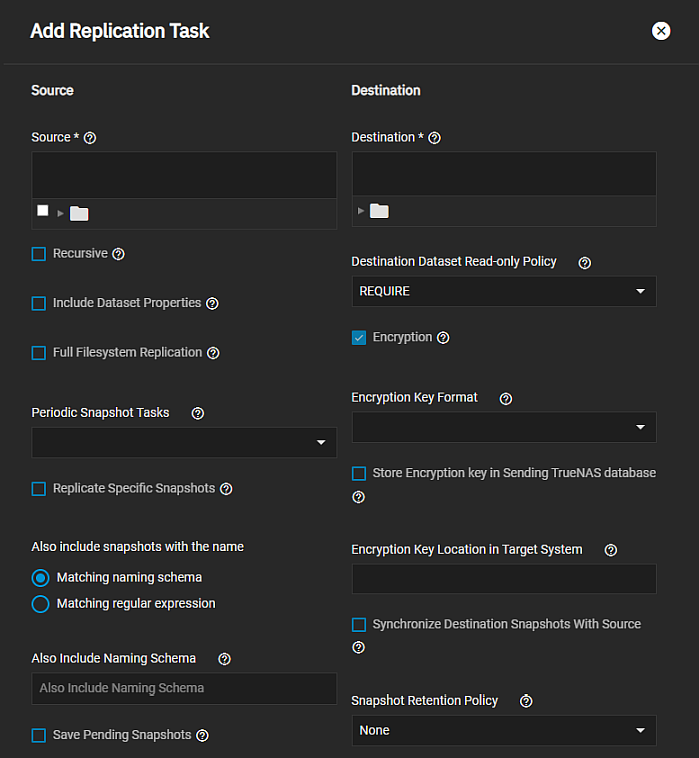
These setting options display on the Add Replication Task wizard What and Where screen after selecting the Destination Location, and on the advanced creation Add Replication Task screen in the Destination settings. After selecting Encryption more setting options display.

AddReplicationTaskEncyptionHexOption

Setting Description
Encryption Select to use encryption when replicating data. Displays the Encryption Key Format and Store Encryption key in Sending TrueNAS database options.
Encryption Key Format Select the encryption option from the dropdown list. Hex (base 16 numeral) or Passphrase (alphanumeric) style encryption key. Selecting Hex displays the Generate Encryption Key option. Selecting Passphrase displays the Passphrase option.
Generate Encryption Key Displays after selecting Hex in Encryption Key Format. Displays selected by default. Clearing the checkbox displays the Encryption Key field.
Encryption Key Displays after clearing the Generate Encryption key checkbox. Use to import a custom hex key.
Passphrase Displays when Encryption Key Format is set to Passphrase. Enter the alphanumeric passphrase to use as an encryption key.
Store Encryption key in Sending TrueNAS database Displays after selecting Encryption. Displays selected by default. Select to store the encryption key in the TrueNAS database. Clearing the checkbox displays the Encryption Key Location in Target System field.
Encryption Key Location in Target System Displays after clearing the Store Encryption key in sending TrueNAS database checkbox. Enter a temporary location for the encryption key that decrypts replicated data.

SSH Settings

Setting the source anor destination location options to On a Different System displays more SSH setting options for whichever location has this setting.

AddReplicationTaskSSHOptions

Setting Description
SSH Connection Select an existing SSH connection to a remote system or select Create New to open the Create SSH Connection window to configure a new SSH connection.
SSH Transfer Security Provides the data transfer security. SSH authenticates the connection. Encryption is recommended but can be disabled for increased speed on more secure network. Select the radio button below to set the level of security for data transfer. Select Encryption (more secure, but slower) to use encryption over the SSL connection, or No Encryption (less secure, but faster) to not encrypt data transferred over the SSL connection.

Create SSH Connection

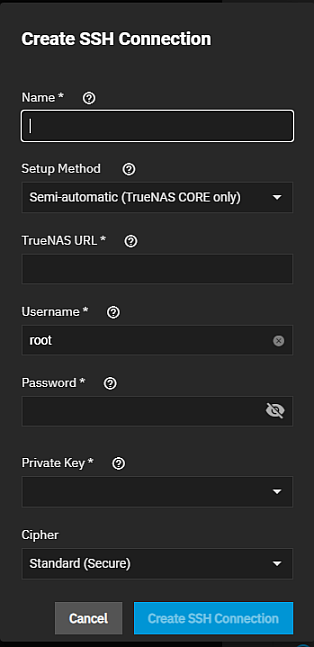
This window allows you to set up a new SSH connection for the remote system.

ReplicationWizardCreateSSHConnection

Setting Description
Name Required. Enter a unique name for this SSH connection.
Setup Method Select how to configure the connection from the dropdown list. Select Manual to configure authentication on the remote system. This option can include copying SSH keys and modifying the root user account on that system. Select Semi-Automatic when configuring an SSH connection with a remote TrueNAS system. This method uses the URL and login credentials of the remote system to connect with and exchange SSH keys. This option only works when the other system is a TrueNAS system.
TrueNAS URL Ener the host name or IP address of the remote system. A valid URL scheme is required. For example, https://10.235.12.20.
Username Enter the user name for logging into the remote system.
Password Enter the password for logging into the remote system.
Private Key Select a saved SSH keypair or select Generate New to create a new keypair and use it for this connection.
Cipher Select a cipher from the dropdown list.

Snapshot Naming Options

Also include snapshots with the name radio button options set the snapshot naming pattern as schema or regular expression. This field display on both the wizard and advanced creation screens but the radio buttons have different names. See Various Snapshot Options below for details.

Also include snapshots with the name radio button options display after selecting On a Different System as either the Source Location or Destination Location or after selecting Replicate Custom Snapshots.

AddReplicationTaskSnapshotOptions

Setting Description
Naming Schema Select to use naming schema and display the Naming Schema field below the radio buttons.
Snapshot Name Regular Expression Select to use regular expression and display the Snapshot Name Regular Expression field below the radio buttons.
Naming Schema Enter the pattern of naming custom snapshots to replicate. Enter the name and strftime(3) %Y, %m, %d, %H, and %M strings that match the snapshots to include in the replication. Separate entries by pressing Enter. The number of snapshots matching the patterns display on the screen.
Snapshot Name Regular Expression Enter the regular expressions snapshot should match. Using this option replicates all snapshots which names match specified regular expression. This option slows regular performance on the systems with large number of snapshots as the process reads snapshots metadata in order to determine snapshots creation order.

When Wizard Screen

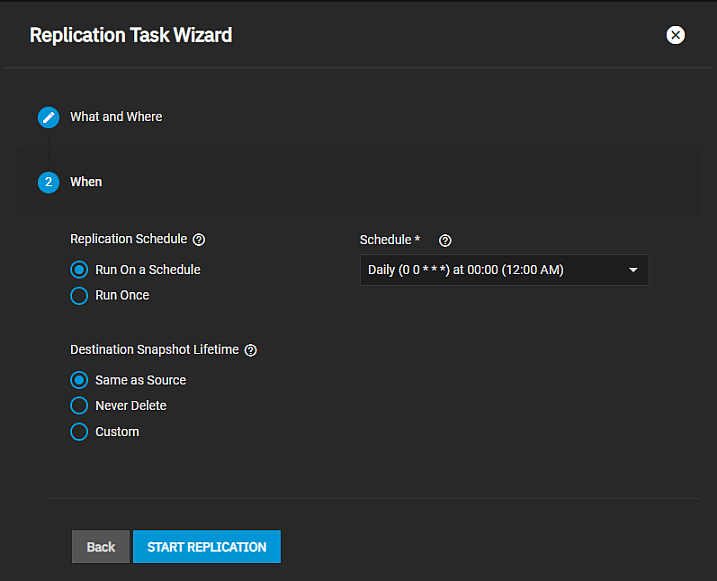
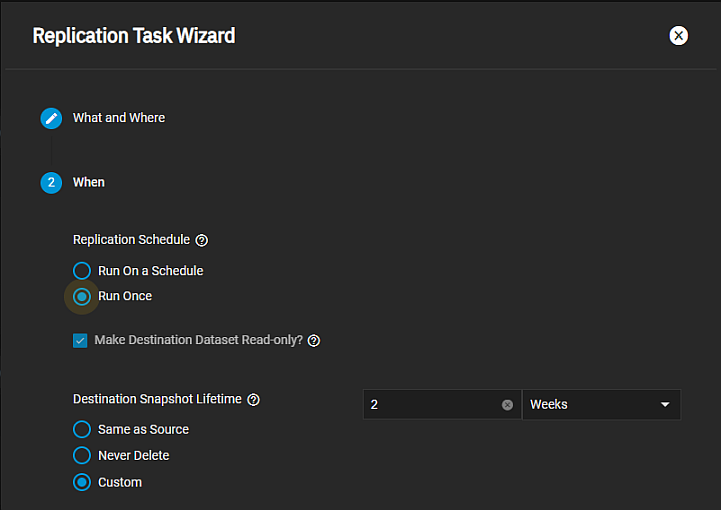
The Replication Schedule and Destination Snapshot Lifetime radio button selection changes the setting options displayed.

Replication Schedule Options

The Replication Schedule radio button options set the task to run on the schedule defined in Schedule or one time. Each radio button changes options displayed on the screen.

ReplicationWizardWhen

Setting Description
Run On a Schedule Displays the Schedule option where you select a preset time or can select Custom to use the advanced scheduler.
Run Once Runs the replication task after you click Start Replication. Displays the Make Destination Dataset Read-only? option. Removes the Schedule option.
Schedule Displays after selecting the Run On a Schedule radio button. Select a preset time or can select Custom to use the advanced scheduler.
Make Destination Dataset Read-only? Select to change the destination dataset to be read-only. To continue using the default or existing dataset read permissions, leave this checkbox cleared.

Destination Snapshot Lifetime Options

The radio buttons change settings displayed. Select when replicated snapshots are deleted from the destination system. Options are the three radio buttons below. Select Same as Source to use the configured snapshot Lifetime value from the source dataset periodic snapshot task. Select Never Delete to never delete snapshots from the destination system. Select Custom to define how long the snapshot remains on the destination system.

AddReplicationTaskWhenRunOnceCustomLifetime

Setting Description
Same as Source Select to use the configured snapshot Lifetime value from the source dataset periodic snapshot task.
Never Delete Select to never delete snapshots from the destination system.
Custom Select to define how long the snapshot remains on the destination system. Displays the number of and measure of time fields to set the schedule.
Number of Enter a numeric value to work with the measure of time selection to set the custom lifetime of the snapshot.
Measure of time Select the option for Hours, Days, Weeks, Months, or Years to work with the number of field to set the custom lifetime of the snapshot.

Advanced Replication Creation changes to the advanced Add Replication Task configuration screen. Click before or after adding values to any setting on the What and When wizard screen.

Advanced Replication Creation Screen

Advanced Replication Creation on the What and Where wizard screen opens the Add Replication Task advanced creation screen. Click this button before or after adding settings on the wizard screen.

Before adding a replication task, create an SSH connection to use when connecting to a remote system. The Add Replication Task wizard provides the option to configure a new SSH connection when adding the task but the advanced creation screen does not.

If adding a local replication task, where you replicate data from one pool and dataset to different pool and dataset on the same system, the SSH connection is not a required element.

General and Transport Options Settings

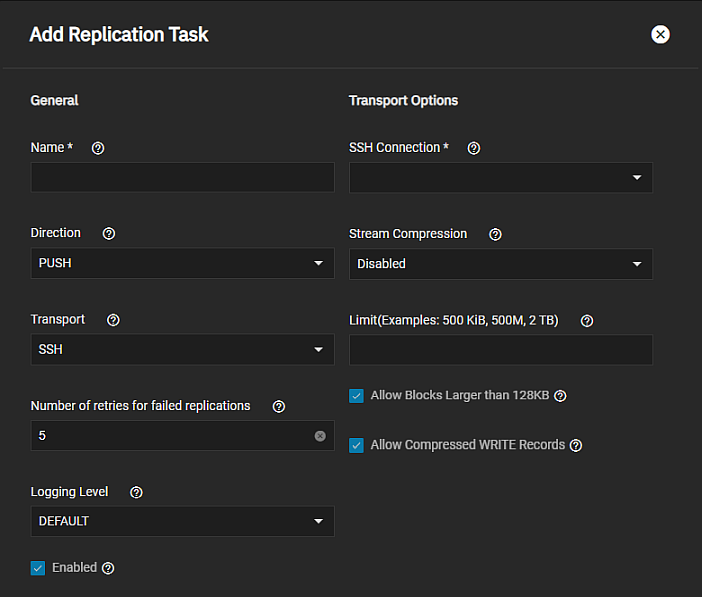
The settings in General and Transport Options specify the name of the task, the direction of the data transfer, the transport connection type and method settings for each type. The Transport setting changes options displayed in the Transport Options area (SSH is the default setting).

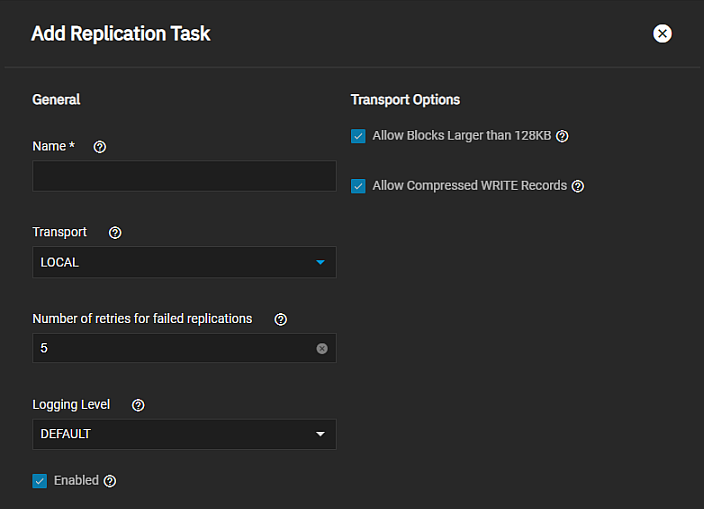
All three Transport field options share the two settings displayed for Local, and the SSH Connection field displays for both the SSH and SSH+NETCAT transport selections.

AdvancedAddReplicationTaskGeneralTransportSSH

General Settings

Setting Description
Name Required. Enter a descriptive name for the replication.
Direction Select the direction for the replication from the dropdown list. Push sends snapshots to a destination system. Pull connect to a remote system and retrieves snapshots matching the value specified in Naming Schema.
Transport Select the method of connecting to a remote system for exchanging data from the dropdown list. SSH is the supported by most systems. It requires a previously created SSH connection on the system. SSH+NETCAT uses SSH to establish a connection to the destination system, then uses py-libzfs to send an unencrypted data stream for higher transfer speeds. This only works when replicating to a FreeNSAS, TrueNAS, or other system with py-libzfs installed. LOCAL efficiently replicates snapshots to another dataset on the same system without using the network. Legacy uses the legacy replication engine from FreeNAS 11.2 and earlier.
Number of retries for failed replications Enter the number of times the replication is attempted before stopping and marking the task as failed.
Logging Level Select the level of message verbosity in the replication task log from the dropdown list. Options are Default, Debug, Info, Warning, and Error.
Enabled Select to enable the replication schedule.

Transport Options Settings - Local Transport Option

These setting display for all three Transport options.

AdvancedAddReplicationTaskGeneralTransportLocal

These settings display for all three Transport options.

Setting Description
Allow Blocks Larger than 128KB Select to allow this replication to send large data blocks. The destination system must also support large blocks. This setting cannot be changed after it is enabled and the replication task is created. For more details, see zfs(8).
Allow Compressed WRITE Records Use compressed WRITE records to make the stream more efficient. The destination system must also support compressed WRITE records. See zfs(8).

Transport Options Settings - SSH Transport Option

These setting options display in addition to the two options displayed when Transport is set to Local.

AdvancedAddReplicationTaskGeneralTransportSSH

Setting Description
SSH Connection Select a connection created and saved in Credentials > Backup Credentials > SSH Connections. If a connection does not display on the the dropdown list, exit the task creation screen. Open Credentials > Backup Credentials and add an SSH connection.
Stream Compression Select a compression algorithm from the dropdown list to reduce the size of the data being replicated. Only appears when SSH is chosen for Transport type.
Limit (Examples: 500 KiB, 500M, 2 TB) Enter the number of bytes per second to limit replication speed to this number of bytes per second.

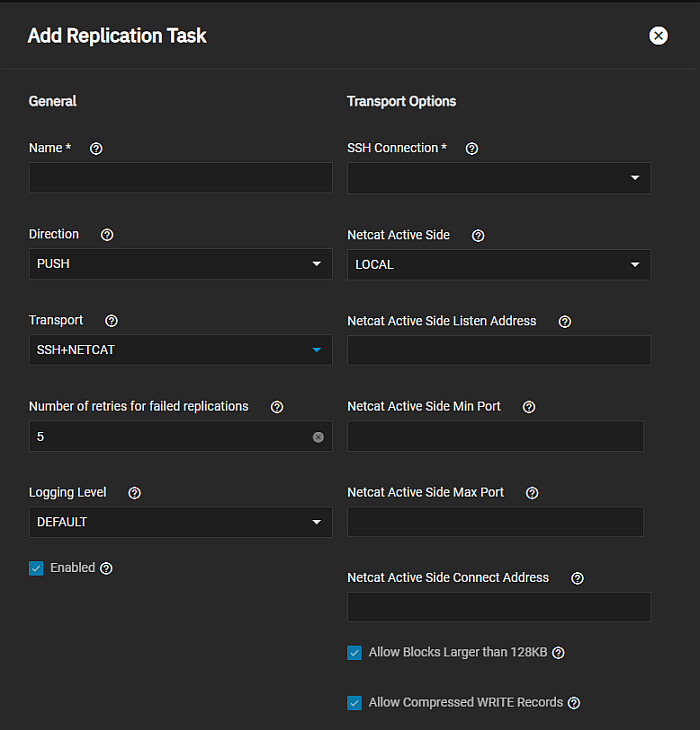
Transport Options Settings - SSH+NETCAT Transport Option

These setting options display in addition to the two options displayed when Transport is set to Local.

AdvancedAddReplicationTaskGeneralTransportSSH+NETCAT

Setting Description
SSH Connection Select a connection created and saved in Credentials > Backup Credentials > SSH Connections. If a connection does not display on the the dropdown list, exit the task creation screen. Open Credentials > Backup Credentials and add an SSH connection.
Netcat Active Side Select the option for the system that opens ports from the dropdown list. Options are Local or Remote. Establishing a connection requires that one of the connection systems has open TCP ports. Consult your IT department to determine which systems are allowed to open ports.
Netcat Active Side Listen Address Enter the IP address on which the connection Active Side listens. Defaults to 0.0.0.0.
Netcat Active Side Min Port Enter the lowest port number of the active side listen address that is open to connections.
Netcat Active Side Max Port Enter the highest port number of the active side listen address that is open to connections. The first available port between the minimum and maximum is used.
Netcat Active Side Connection Address enter the host name or IP address used to connect to the active side system. When the active side is Local, this defaults to the SSL_CLIENT environment variable. When the active side is Remote, this defaults to the SSH connection host name.

Advanced Source Options

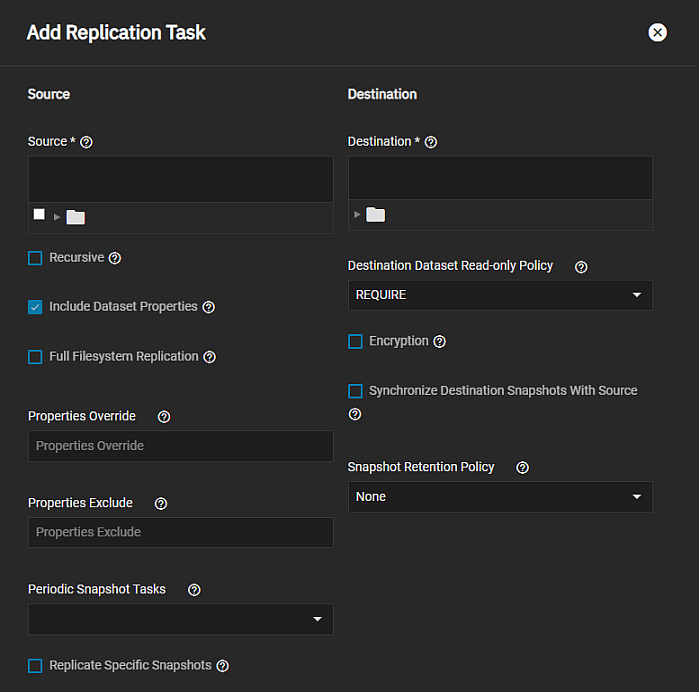
The settings in Source specify the location of files you push or pull in the replication task, and the properties applied to the replicated data.

The Source setting options change based on selections made in Recursive and Replicate Specific Snapshots and each display additional setting options.

AdvancedAddRepTaskSourceAndDestination

Setting Description
Source Required. Enter or use arrow_right to the left of folder/mnt and at each dataset to expand the dataset tree to browse to the dataset location that has snapshots to replicate. Click on the folder or checkbox to select the checkbox to the left of the dataset. To enter multiple datasets, enter a comma (,) after each path in the Source field and then select another dataset. Click the arrow_drop_down at the folder/mnt to collapse the dataset tree.
Recursive Select to replicate all child dataset snapshots. When selected, Exclude Child Datasets displays.
Exclude Child Datasets Displays after selecting Recursive. Enter the specific child dataset snapshots from the replication. Separate each entry by pressing Enter.
Include Dataset Properties Select to include dataset properties with the replicated snapshots.
Full Filesystem Replication Select to completely replicate the selected dataset. The target dataset gets all the properties of the source dataset, child datasets, clones and snapshots that match the specified naming schema. Hides the Recursive and Include Dataset Properties options.
Properties Override Enter properties to replace existing dataset properties with in the replicated files.
Properties Exclude Enter any existing dataset properties to remove from the replicated files.

Advanced Destination Options

The settings in Destination specify the location of files you push or pull in the replication task, and the properties applied to the replicated data.

The destination setting options change based on selections made in Encryption and Snapshot Retention Policy which display additional setting options.

AdvancedAddReplicationTaskDestinationOptions

Setting Description
Destination Required. Enter or use arrow_right to the left of folder/mnt and at each dataset to expand the dataset tree to browse to the dataset location to store the replicated snapshots. Click on the folder or checkbox to select the checkbox to the left of the dataset. Selecting a location defines the full path to that location as the destination. Appending a name to the path creates a new zvol at that location. For example, selecting pol1/dataset1 stores snapshots in dataset 1, but adding /zvol1 after dataset1 creates zvol1 for snapshot storage. Click the
arrow_drop_down at the folder/mnt to collapse the dataset tree.
Destination Dataset Read-Only Policy Select the policy from the dropdown list. Options are Set that changes all destination datasets to readonly=on after finishing the replication. Require stops replication unless all existing destination datasets have the property readonly=on. Ignore disables checking the readonly property during replication.
Encryption Select to use encryption when replicating data. For more information on all options see Encryption.
Synchronize Destination Snapshots With Source Select if the destination system has snapshots but they do not have any data in common with the source snapshot, destroy all data destination snapshots and do a full replication. WARNING! Enabling this option can cause data loss or excessive data transfer if the replication is misconfigured.
Snapshot Retention Policy Select the policy from the dropdown list to apply when replicated snapshots are deleted from the destination system. Options are Same as Source, Custom and None. When selecting Same as Source use the Snapshot Lifetime from the source periodic snapshot task. When selecting Custom define a Snapshot Lifetime for the destination system. Also displays the Snapshot Lifetime and measure of time options. When selecting None never delete snapshots from the destination system.
Snapshot Lifetime Use to enter a numeric value to work with the measure of time field below to specify how long a snapshot remains on the destination system.
Measure of time Select the measure of time from the dropdown list to work with the numeric value in Snapshot Lifetime. Options are Hour(s), Day(s), Week(s), Month(s), and Year(s).

Various Snapshot Options

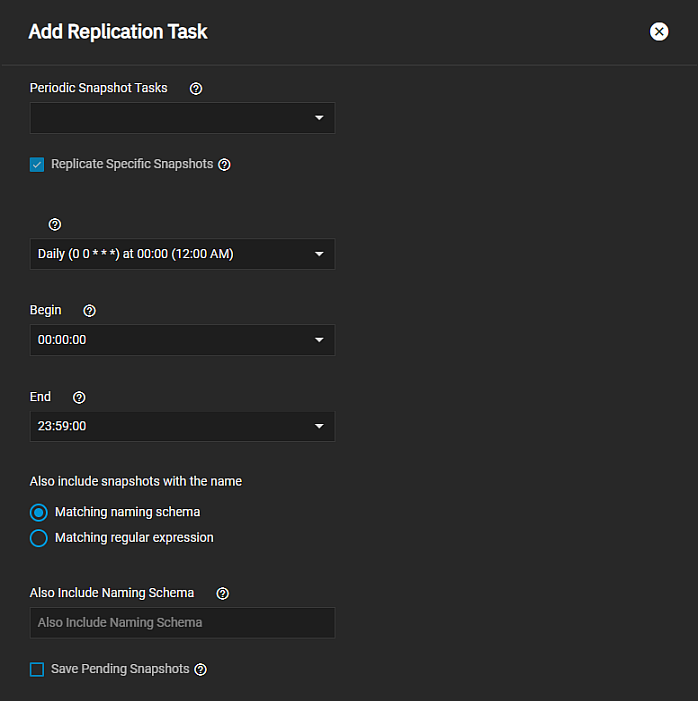
The snapshot settings below change options displayed based on selections made.

AdvancedAddReplicationTaskSnapshotOptions

Setting Description
Replicate Specific Snapshots Select to only replicate snapshots that match a defined creation time. Selecting this option displays a schedule preset field and the Begin and End fields. Sselect the preset schedule or Custom to use the advanced scheduler, and then select a time in the Begin and End fields. A schedule field displays after selecting Replicate Specific Snapshots. Again, select a preset schedule or Custom to use the advanced scheduler.
Begin Displays after selecting Replicate Specific Snapshots. Select a time range for the specific periodic snapshots to replicate, in 15 minute increments. Periodic Snapshots created before this selected time are not included in the replication.
End Displays after selecting Replicate Specific Snapshots. Select a time range for the specific periodic snapshots to replicate, in 15 minute increments. Periodic Snapshots created after this selected time are not included in the replication.
Periodic Snapshot Tasks Select the snapshot schedule for this replication task from the dropdown list. Select from previously configured periodic snapshot tasks. This replication task must have the same Recursive and Exclude Child Dataset values as the selected periodic snapshot task. Selecting a periodic snapshot schedule removes the Schedule field.
Also include snapshots with the name These radio buttons change the naming schema setting option below it. See Snapshot Naming in the wizard section for details on this option and the radio buttons.
Matching naming schema Displays the Also Include Naming Schema setting.
Matching regular expression Displays the Matching regular expression setting.
Also Include Naming Schema Displays after selecting the Matching naming schema radio button. Enter the pattern of naming custom snapshots to include in the replication with the periodic snapshot schedule. Enter the strftime(3) strings that match the snapshots to include in the replication. When a periodic snapshot is not linked to the replication, enter the naming schema for manually created snapshots. Has the same %Y, %m, %d, %H, and %M string requirements as the Naming Schema in a Add Periodic Snapshot Task. Separate entries by pressing Enter.
Matching regular expression Displays after selecting the Matching regular expression radio button. Enter the regular expressions snapshot should match. Using this option replicates all snapshots with names matching the specified regular expression. This process reads snapshot metadata to determine snapshot creation order. This slows regular performance on the systems with large number of snapshots.
Save Pending Snapshots Select to prevent source system snapshots that have failed replication from being automatically removed by the Snapshot Retention Policy.

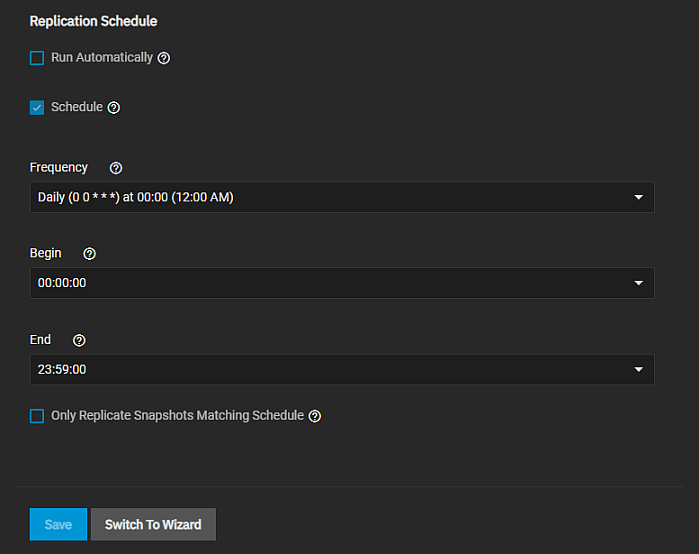
Replication Schedule Advanced Options

These schedule setting options are common to both the Add Replication Task wizard When and the advanced creation Add Replication Task screens.

AdvancedAddReplicationTaskScheduleOptions

Setting Description
Run Automatically Select to either start this replication task immediately after the linked periodic snapshot task completes.
Schedule Select to create a replication schedule if not selecting Run Automatically. Displays the Frequency, Begin, End and Only Replicate Snapshots Matching Schedule options.
Frequency Displays after selecting Schedule. Select a preset schedule or choose Custom to use the advanced scheduler.
Begin Displays after selecting Schedule. Select the start time for the replication task.
End Displays after selecting Schedule. Select the end time for the replication task. A replication that is already in progress can continue to run past this time.
Only Replicate Snapshots Matching Schedule Displays after selecting Schedule. Select to use the Schedule in place of the Replicate Specific Snapshots time frame. The Schedule values are read over the Replicate Specific Snapshots time frame.

Edit Replication Task Screen

The Edit Replication Task screen displays most of the settings found on the advanced Add Replication Task screen with a few exceptions.

  • General settings do not include the Direction option. The Transport is setting on the edit screen are the same setting as the advanced creation settings.
  • Source and Destination setting options are the same as the advanced creation settings.
  • Replication Schedule setting options are the same as the advanced creation settings.

See the section linked above for information on the Edit Replication Task screen settings.

Related Content