Interfaces Screen
5 minute read.
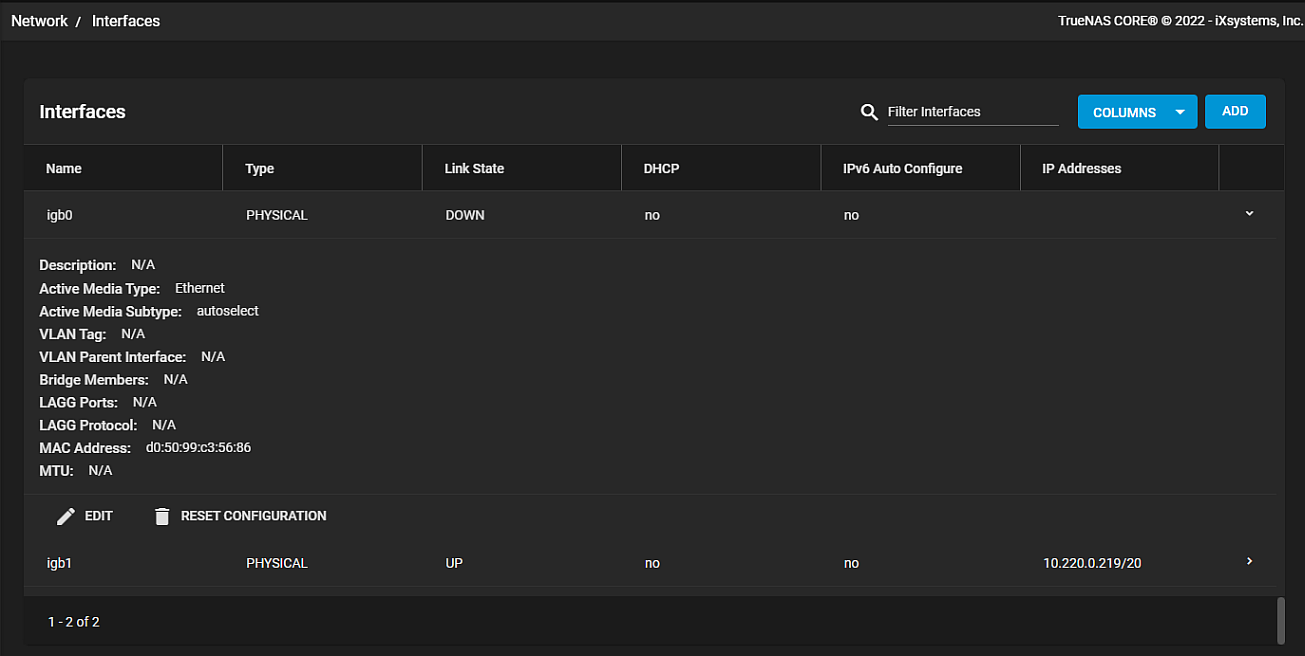
Last Modified 2022-10-10 10:29 -0400Use the Network > Interface Screen to add various network interfaces to your TrueNAS.

Use the COLUMNS button to display options to modify the information displayed in the Interfaces table. Options are Type, Link State, DHCP, IPv6 Auto Configure, IP Addresses, Description, Active Media Type, Active Media Subtype, VLAN Tag, VLAN Parent Interface, Bridge Members, LAGG Ports, LAGG Protocol, MAC Address, MTU or Reset to Defaults.
Use ADD to display the Interface Add screen.
To see the details for any interface click the symbol to the right of the interface.
Each interface has a detailed view with the current interface settings and additional actions available for the interface.

Use EDIT to display the Network Interface Edit screen. Several settings are not editable and do not appear on the Edit screen.
Use RESET CONFIGURATION to reset the selected interface. Resetting the configuration interrupts network connectivity. The Reset Configuration dialog displays. You must select Confirm to activate the RESET CONFIGURATION button.
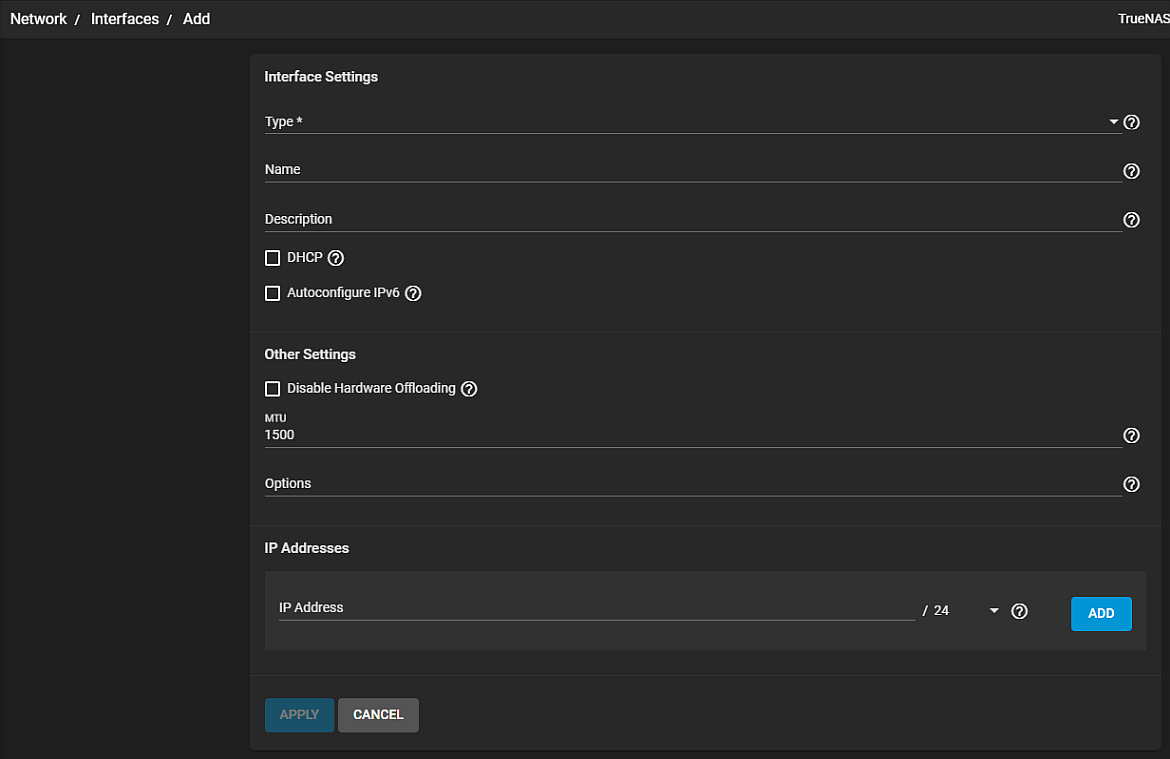
The Interface Add screen displays additional configuration settings based on the type of interface selected.

Interface Settings
| Settings | Description |
|---|---|
| Type | Select the type of interface from the dropdown list. Select Bridge to create a logical link between mutliple networks. Select Link Aggregation to combine multiple network connections into a single interface. Select VLAN for a virtual LAN to partition and isolate a segment of the connection. |
| Name | Enter a name for the interface. Use the format bridgeX laggX or vlanX where X is a number representing a non-parent interface. |
| Description | Enter a description for the interface. For example, what it is used for. |
| DHCP | Select to enable DHCP. Leave checkbox clear to crate a static IPv4 or IPv6 configuration. Only one interface can be configured for DCHP. |
| Autoconfigure IPv6 | Select to automatically configure the IPv6 address with rtsol(8). Only one interface can be configured this way. |
Other Settings
| Settings | Description |
|---|---|
| Dsable Hardware Offloading | Select to turn off hardware offloading for network traffice processing. Warning! Disabling hardware offloading can reduce network performance, and is only recommended when the interface is managing jails, plugins or virtual machines. |
| MTU | A maximum transmission unit (MTU) is the largest protocol data unti that can be communicated. The largest workable MTU size varies with network interfaces and equipment. 1500 and 9000 are standard Ethernet MTU sizes. Leave blank restores this field to the default value of 1500. |
| Options | Enter additional parameters from ifconfig(8). |
Other Settings
| Settings | Description |
|---|---|
| IP Addresses | Select an IP address from the dropdown list to define an alias for the interface on this TrueNAS controller. The alias can be an IPv4 or IPv6 address. |
| ADD | Adds a row to configure another IP address. A DELETE button displays to allow you to delete the extra IP address. |
Bridge Settings
| Settings | Description |
|---|---|
| Bridge Memebers | Select network interfaces to include in the bridge from the dropdown list. |
Ling Aggreation Settings
| Settings | Description |
|---|---|
| Lagg Protocol | Select the lagg protocol from the dropdown list. This determines the outgoing and incoming traffic ports. LACP is the recommended protocol if the network switch is capable of active LACP. Failover is the default protocol choice and should be used if the network switch does not support active LACP. See lagg(4) for more details. |
| Lagg Interfaces | Select the interfaces on your TrueNAS to use in the aggregation from the dropdown list. Warning! Lagg creation fails if any of the selected interfaces have been manually configured. |
VLAN Settings
| Settings | Description |
|---|---|
| Parent Interface | Select the VLAN parent interface on your TrueNAS from the dropdown list. Usually Ethernet card connected to a switch port configured for the VLAN. New link aggregations are not available until the system is restared. |
| Vlan Tag | Enter the numeric tag configured in the switched network. This is a required field. |
| Prioirty Code Point | Select the Class of Service from the dropdown list. The available 802.1p class of service ranges from **Best effort (default) to Network control (highest). |
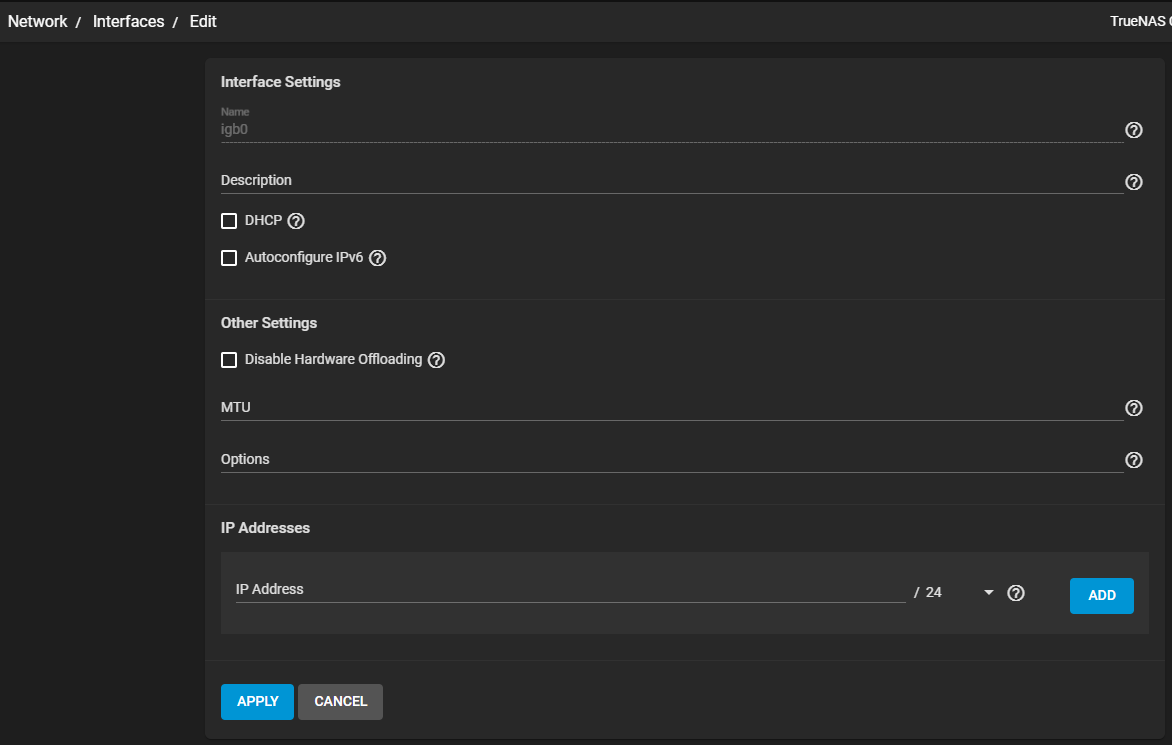
The Interface Edit screen displays only the editable configuration settings for the inface selected.

Interface Settings
| Settings | Description |
|---|---|
| Name | Displays the name for the selected interface. This field cannot be edited. |
| Description | Enter a description for the interface. For example, what it is used for. |
| DHCP | Select to enable DHCP. Leave checkbox clear to crate a static IPv4 or IPv6 configuration. Only one interface can be configured for DCHP. |
| Autoconfigure IPv6 | Select to automatically configure the IPv6 address with rtsol(8). Only one interface can be configured this way. |
Other Settings
| Settings | Description |
|---|---|
| Dsable Hardware Offloading | Select to turn off hardware offloading for network traffice processing. Warning! Disabling hardware offloading can reduce network performance, and is only recommended when the interface is managing jails, plugins or virtual machines. |
| MTU | A maximum transmission unit (MTU) is the largest protocol data unti that can be communicated. The largest workable MTU size varies with network interfaces and equipment. 1500 and 9000 are standard Ethernet MTU sizes. Leave blank restores this field to the default value of 1500. |
| Options | Enter additional parameters from ifconfig(8). |
Other Settings
| Settings | Description |
|---|---|
| IP Addresses | Select an IP address from the dropdown list to define an alias for the interface on this TrueNAS controller. The alias can be an IPv4 or IPv6 address. |
| ADD | Adds a row to configure another IP address. A DELETE button displays to allow you to delete the extra IP address. |
Use APPLY to save changes to settings and return to the Interfaces screen.

