Adding SMB Shares
12 minute read.
Last Modified 2022-12-05 12:32 -0500SMB (also known as CIFS) is the native file sharing system in Windows. SMB shares can connect to most operating systems, including Windows, MacOS, and Linux. TrueNAS can use SMB to share files among single or multiple users or devices.
SMB supports a wide range of permissions, security settings, and advanced permissions (ACLs) on Windows and other systems, as well as Windows Alternate Streams and Extended Metadata. SMB is suitable for managing and administering large or small pools of data.
TrueNAS uses Samba to provide SMB services. The SMB protocol has multiple versions. An SMB client typically negotiates the highest supported SMB protocol during SMB session negotiation. Industry-wide, SMB1 protocol (sometimes referred to as NT1) usage is being deprecated for security reasons. However, most SMB clients support SMB 2 or 3 protocols, even when they are not default.
Legacy SMB clients rely on NetBIOS name resolution to discover SMB servers on a network. TrueNAS disables the NetBIOS Name Server (nmbd) by default. Enabled in Network if you require its functionality.
MacOS clients use mDNS to discover SMB servers present on the network. TrueNAS enables the mDNS server (avahi) by default.
Windows clients use WS-Discovery to discover the presence of SMB servers, but network discovery can be disabled by default depending on the Windows client version.
Discoverability through broadcast protocols is a convenience feature and not required to access an SMB server.
Adding an SMB share to your system involves several steps to add the share and get it working.
First you set up the storage for your new share.
Next you create local user accounts. It is also possible to use Directory Services to provide additional user accounts.
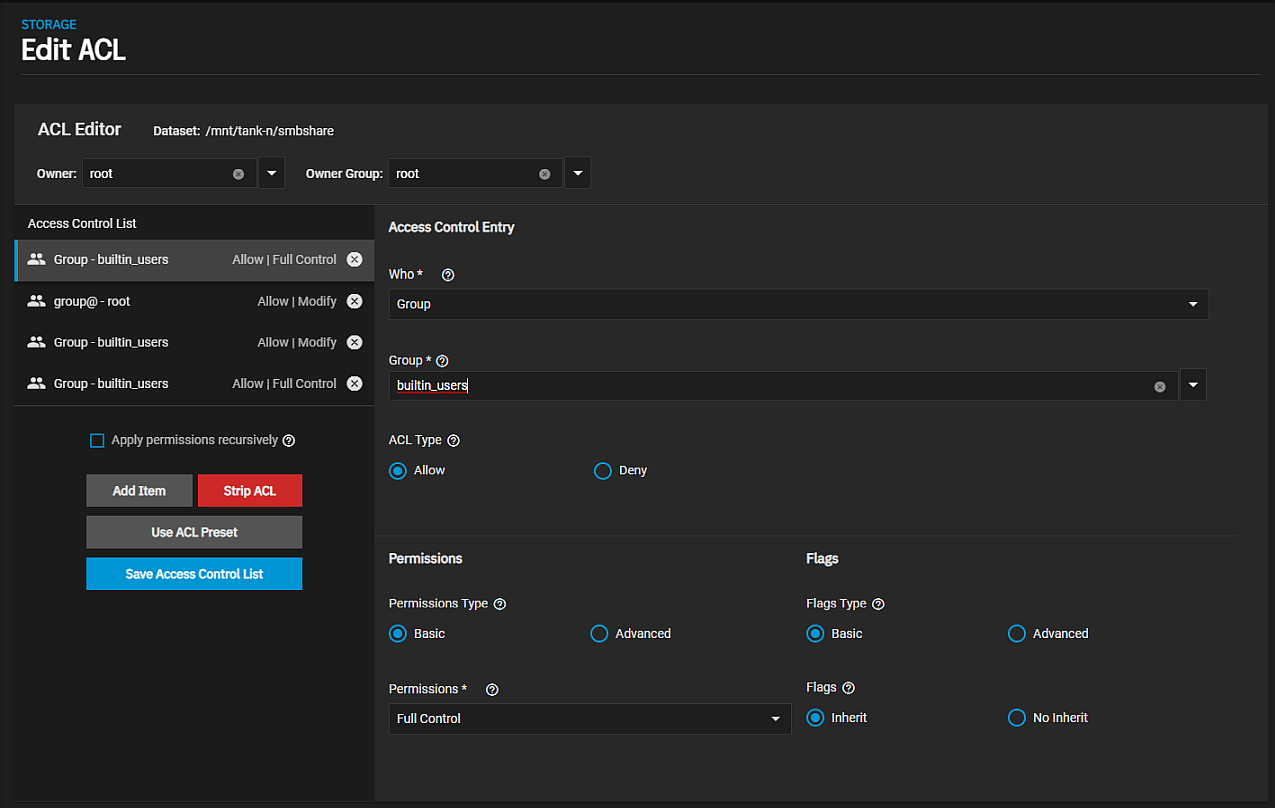
After adding or modifying local users, modify the dataset ACL.
Now you create the SMB share. You can create a basic SMB share or for more specific share types or feature requirements, use the Advanced Options instructions before you save the share.
After adding the share you start the service and mount it to your other system.
Before creating the SMB share, first add the dataset the share uses for data storage.
We recommend creating a new dataset with the Share Type set to SMB for the new SMB share.
Use Credentials > Local Users to add new users to your TrueNAS.
By default, all new local users are members of a built-in SMB group called builtin_users.
You can use the group to grant access to all local users on the server or add more groups to fine-tune permissions to large numbers of users.You cannot access SMB shares with the root user, or user accounts built-in to TrueNAS or those without the smb flag.
After creating a dataset and accounts, you need to investigate your access requirements and adjust the dataset ACL to match. Many home users typically add a new ACL entry that grants FULL_CONTROL to the builtin_users group with the flags set to INHERIT.
You cannot access SMB shares with the root user. Always change SMB dataset ownership to the intended SMB user.
To create a basic Windows SMB share, go to Shares.
-
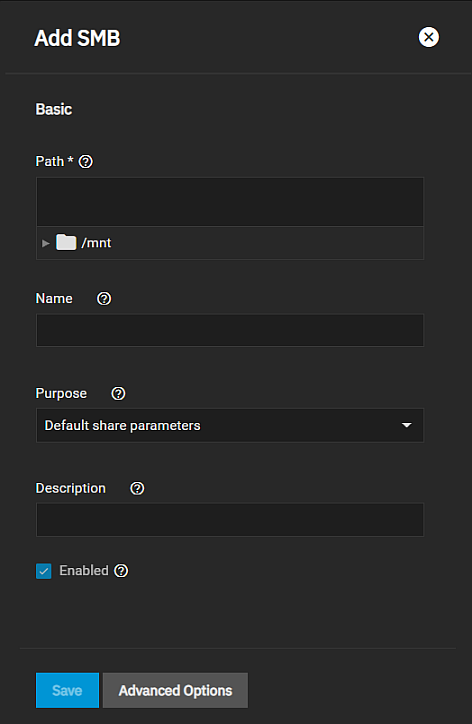
Click on Windows Shares (SMB) to select it and then click Add. The Add SMB configuration screen displays the Basic Options settings.

-
Enter the SMB share Path and Name.
The Path is the directory tree on the local file system that TrueNAS exports over the SMB protocol.
The Name is the SMB share name, which forms part of the full share pathname when SMB clients perform an SMB tree connect. Because of how the SMB protocol uses the name, it must be less than or equal to 80 characters and it cannot have any invalid characters as specified in Microsoft documentation MS-FSCC section 2.1.6. If you do not enter a name the share name becomes the last component of the path.
-
(Optional) Select a preset from the Purpose dropdown list to apply and lock or unlock pre-determined Advanced Options settings for the share. To retain control over all the share Advanced Options settings, select No presets.
-
(Optional) Enter a Description to help explain the share purpose.
-
Select Enabled to allow sharing of this path when the SMB service is activated. Leave it cleared if you want to disable but not delete the share configuration.
-
Click Save to create the share and add it to the Shares > Windows (SMB) Shares list.
You can also choose to enable the SMB service at this time.
For a basic SMB share you do not need to use the Advanced Options settings, but if you set Purpose to No Presets, click Advanced Options to finish customizing the SMB share for your use case.
The following are possible use cases, but for all settings see SMB Shares Screens.
To add ACL support to the share, select Enable ACL, and then see Managing SMB Shares for more on configuring permissions for the share and the file system.
If you want to allow guest access to the share, select Allow Guest Access.
To prohibit writes to the share, select Export Read Only.
To restrict share visibility to users with read or write access to the share, select Access Based Share Enumeration. See the smb.conf manual page.
To control allowed or denied host names or IP addresses, use the Host Allow and Host Deny options.
AFP shares are deprecated and not available in SCALE. To customize your SMB share to work with a migraged AFP share or with your MacOS, use the Advanced Options settings provided for these uses cases.
To connect to an SMB share you must start the related system service. You can start the service from the Windows SMB Share header on the Sharing screen or on the System Settings > Services screen.
From the main Sharing screen, click on the Windows (SMB) Shares to display the service options which are Turn Off Service if the service is running or Turn On Service if the service is stopped.

Each SMB share on the list also has a toggle you can use to enable or disable the service for that share.
To make SMB share available on the network, go to System Settings > Services and click the toggle to running for SMB. Set Start Automatically if you want the service to activate when TrueNAS boots.
Configure the SMB service by clicking edit. Unless you need a specific setting or are configuring a unique network environment, we recommend the default settings.
The instructions in this section cover mounting the SMB share on system with the following operating systems.
Verify that your Linux distribution has the required CIFS packages installed.
Have the information on the Windows drive letter, computer name and share name ready before you start.
Have the user name and password for the user assigned to pool or for the guest if the share has guest access ready before you begin.
Mounting on a FreeBSD system involves creating the mount point and then mounting the volume.
Related Content
- SMB Shares Screens
- Managing SMB Shares
- Using SMB Shadow Copy
- Setting Up SMB Home Shares
- Configuring SMB Service
- SMB Service Screen
- Spotlight Support on a SCALE SMB Share


