Console Setup Menu Configuration
5 minute read.
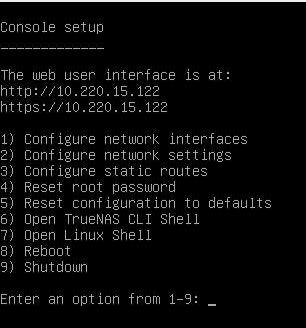
Last Modified 2022-12-09 13:03 -0500The Console setup menu (CSM) displays at the end of the boot process. If the TrueNAS system has a keyboard and monitor, you can use this menu to administer the system.
By default, TrueNAS does not display the Console setup menu when you connect via SSH or the web shell.
The root user or another user with root permissions can start the Console setup menu by entering the /etc/netcli command.

The menu provides these options:
-
1) Configure network interfaces which provides options to set up network interfaces. These display in the Global Configuration widget on the Network screen in the web UI.
-
2) Configure network settings which provides options to set up the network default gateway, host name, domain, IPv4 gateway and the DNS name servers.
-
3) Configure static routes which provides options to setup static routes. Not required as part of the initial configuration setup.
-
4) Reset root password which resets the root user password. This is the password for the
rootuser in the CLI and the root user login password for the web UI. -
5) Reset configuration to defaults which resets the system configuration settings back to defaults.
-
6) Open TrueNAS CLI shell which starts a shell for running TrueNAS commands. Type
exitto leave the shell. -
7) Open Linux shell which starts a shell window for running Linux CLI commands. Type
exitto leave the shell. -
8) Reboot which reboots the system.
-
9) Shut down which shuts down the system.
Console setup menu options can change with software updates, service agreements, etc.
During boot, TrueNAS attempts to connect to a DHCP server from all live interfaces. If it receives an IP address, the Console setup menu displays it under The web user interface is at: so you can access the Web UI.
You might be able to access the web UI using a hostname.domain command at the prompt (default is truenas.local) if your system:
- Does not have a monitor.
- Is on a network that supports Multicast DNS (mDNS).
You can use the Console setup menu to configure your primary network interface and any other interfaces you want to uses such as a link aggregate (LAGG) or virtual LAN (VLAN). You can also use the Console setup menu to configure other network settings such as the default gateway, host name, domain, and the DNS name servers, or add static routes.
Enter 1 to display the Configure Network Interfaces screen where you can select the interface settings. If you want to use commands, enter 7 to open a Linux shell and then enter commands.
Enter 2 to display the Network Settings screen where you set up the host name, domain, default gateway and name servers.
Enter 3 to display the Static Route Settings screen where you can set up any static routes. You can also add static routes in the web UI.
First, configure your primary network interface. The IP address assigned by DHCP displays in the Console setup menu screen. You can configure the default gateway, host name, domain and DNS name severs using the Console setup menu but you should use the web UI to configure these settings. Go the Network screen.

To use the CSM, type 1 to display the Configure Network Interfaces screen. Select the interface to use as your primary network interface and the settings to use. Use Tab to select Save and then press Enter.
Next, open a browser window and enter the IP address DHCP assigned to your TrueNAS. The web UI should display, verifying you can access it. If it does not, return to the Console setup menu and re-enter the correct IP address as the primary interface address.
Log into the web UI as root with the default password set up during step 4 of the TrueNAS Installer process in Installing Scale.
After configuring the interface, you can use the CSM to configure the rest of your network settings, but this procedure describes using the web UI to configure the rest of the network settings.
To enter the remaining network settings in the web UI, go to Network > Global Configuration and click Settings. Enter the values in the appropriate fields and click Save.
For home users, use 8.8.8.8 as the DNS nameserver address. This allows you to access the internet using TrueNAS SCALE.
SCALE has implemented rootless login, making the admin user the default account. Change the admin user password in the UI.
The Reset root password option in the console menu is useless if the admin password is enabled and the root user password is disabled in the Edit User screen. Disabling a password in the UI prevents the user from logging in with it.
Changing the root password disables 2FA (Two-Factor Authentication).
Caution! Resetting the configuration deletes all settings and reverts TrueNAS to default settings. Before resetting the system, back up all data and encryption keys/passphrases! After the system resets and reboots, you can go to Storage and click Import to re-import pools.
Enter 5 in the Console setup menu, then enter y to reset the system configuration. The system reboots and reverts to default settings.
After setting up network requirements in the web UI, complete your system setup by:
- Setting up storage
- Setting up sharing
- Backing Up your Configuration
Related Content
- Creating Storage Pools
- Adding Network Settings
- Installing SCALE
- Migrating from TrueNAS CORE
- Importing Data
- Setting Up Storage
- First Time Login
- Setting Up Data Sharing
- Backing Up TrueNAS

