User and Group Quota Screens
5 minute read.
Last Modified 2022-12-05 13:33 -0500TrueNAS allows setting data or object quotas for user accounts and groups cached on or connected to the system. Go to Storage > Pools, find the desired dataset, and click to open the Dataset Actions menu and see the User Quota and Group Quota options.
Clicking User Quotas from the Dataset Actions menu shows the User Quotas screen.

| Setting | Description |
|---|---|
| Filter User Quotas | Enter a string to show saved quotas that match the string. |
| Columns | Displays options to customize the table view to add or remove information. Options are Select All, ID, Data Quota, DQ Used, DQ % Used, Object Quota, Objects Used, OQ % Used, and Reset to Defaults. After selecting Select All the option toggles to Unselect All. |
| Actions | Shows additional options to manage or add entries to this screen. |
| Setting | Description |
|---|---|
| Toggle Display | Changes the view between filter and list views. By default, only user accounts with a quota are shown (filter view). Switching to the list view shows all available users, even if the user has no quota assigned. |
| Set Quotas (Bulk) | Opens the Set User Quotas screen to add quotas. |
Click the icon to display a detailed individual user quota view.

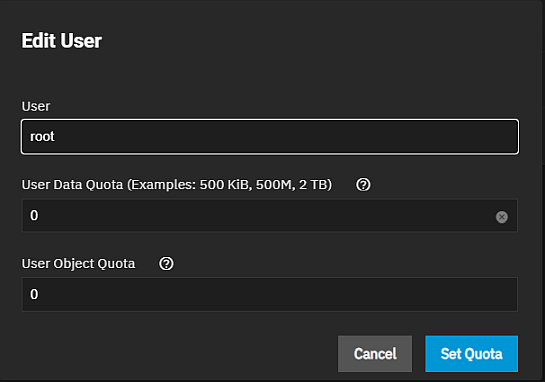
Click the Edit button to display the Edit User window.
The Edit User window allows modifying individual user data and object quota values.

| Settings | Description |
|---|---|
| User | Displays the name of the selected user. |
| User Data Quota (Examples: 500KiB, 500M, 2 TB) | Enter the amount of disk space the selected user can use. Entering 0 allows the user to use all disk space. You can enter human-readable values such as 50 GiB, 500M, 2 TB, etc.). If units are not specified, the value defaults to bytes. |
| User Object Quota | Enter the number of objects the selected user can own. Entering 0 allows unlimited objects. |
Click Set Quota to save changes or Cancel to close the window without saving.
Click Actions > Set Quotas (Bulk) to see the Set User Quotas screen.

| Settings | Description |
|---|---|
| User Data Quota (Examples: 500KiB, 500M, 2 TB) | Enter the amount of disk space the selected user can use. Entering 0 allows the user to use all disk space. You can enter human-readable values such as 50 GiB, 500M, 2 TB, etc.). If units are not specified, the value defaults to bytes. |
| User Object Quota | Enter the number of objects the selected user can own. Entering 0 allows unlimited objects. |
| Settings | Description |
|---|---|
| Select Users Cached by this System | Select the users from the dropdown list of options. |
| Search for Connected Users | Click in the field to see the list of users on the system or type a user name and press Enter. A clickable list displays of found matches as you type. Click on the user to add the name. A warning dialog displays if there are not matches found. |
Click Submit to set the quotas or Cancel to exit without saving.
Clicking Group Quotas from the Dataset Actions menu shows the Edit Group Quotas screen.

The Edit Group Quotas screen displays the names and quota data of any groups cached on or connected to the system.
| Setting | Description |
|---|---|
| Filter Group Quotas | Enter a string to show saved quotas that match the string. |
| Columns | Displays options to customize the table view to add or remove information. Options are Select All, ID, Data Quota, DQ Used, DQ % Used, Object Quota, Objects Used, OQ % Used, and Reset to Defaults. After selecting Select All the option toggles to Unselect All. |
| Actions | Shows additional options to manage or add entries to this screen. |
| Setting | Description |
|---|---|
| Toggle Display | Changes the view between filter and list views. By default, only group accounts with a quota are shown (filter view). Switching to the list view shows all available groups, even if the group has no quota assigned. |
| Set Quotas (Bulk) | Opens the Set Group Quotas screen to add quotas. |
Click the icon to display a detailed individual group quota view.

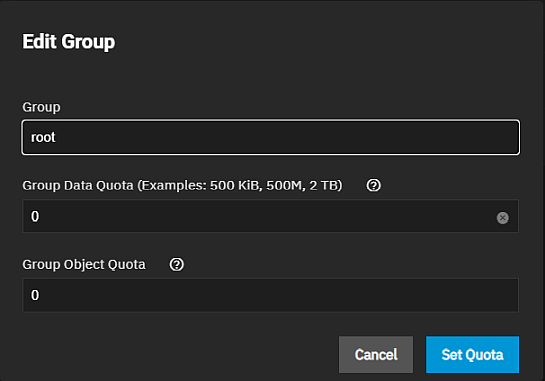
Click the Edit button to display the Edit Group window.
The Edit Group window allows you to modify the group data quota and group object quota values for an individual group.

| Settings | Description |
|---|---|
| Group | Displays the name of the selected group(s). |
| Group Data Quota (Examples: 500KiB, 500M, 2 TB) | Enter the amount of disk space the selected group can use. Entering 0 allows the group to use all disk space. You can enter human-readable values such as 50 GiB, 500M, 2 TB, etc.). If units are not specified, the value defaults to bytes. |
| Group Object Quota | Enter the number of objects the selected group can own or use. Entering 0 allows unlimited objects. |
Click Set Quota to save changes or Cancel to close the window without saving.
Click **Actions > Set Quotas (Bulk) ** to see the Set Group Quotas screen.

| Settings | Description |
|---|---|
| Group Data Quota (Examples: 500KiB, 500M, 2 TB) | Enter the amount of disk space the selected group can use. Entering 0 allows the group to use all disk space. You can enter human-readable values such as 50 GiB, 500M, 2 TB, etc.). If units are not specified, the value defaults to bytes. |
| Group Object Quota | Enter the number of objects the selected group can own or use. Entering 0 allows unlimited objects. |
| Settings | Description |
|---|---|
| Select Groups Cached by this System | Select the users from the dropdown list of options. |
| Search for Connected Groups | Click in the field to see the list of groups on the system or type a group name and press Enter. A clickable list displays of found matches as you type. Click on the group to add the name. A warning dialog displays if there are no matches found. |
Click Submit to set the quotas or Cancel to exit without saving.

