Console Setup Menu
4 minute read.
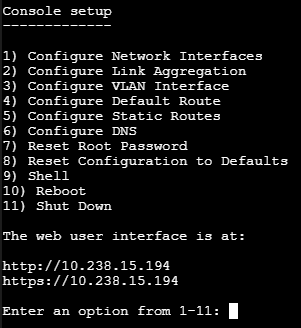
Last Modified 2022-09-15 15:31 -0400The Console Setup menu displays at the end of the boot process. If the TrueNAS system has a keyboard and monitor, this menu can be used to administer the system.
When connecting with SSH or the web shell, the Console Setup menu is not shown by default.
It can be started by the root user or another user with root permissions by entering /etc/netcli.
To disable the Console Setup menu, go to System > Advanced and unset Show Text Console without Password Prompt.

On HA systems, some of these menu options are not available unless HA has been administratively disabled.
The menu provides these options:
-
Configure Network Interfaces provides a configuration wizard to set up the system’s network interfaces. If the system has been licensed for High Availability (HA), the wizard prompts for IP addresses for both “This Controller” and “TrueNAS Controller 2”.
-
Configure Link Aggregation is for creating or deleting link aggregations.
-
Configure VLAN Interface is used to create or delete VLAN interfaces.
-
Configure Default Route is used to set the IPv4 or IPv6 default gateway. When prompted, enter the IP address of the default gateway.
-
Configure Static Routes prompts for the destination network and gateway IP address. Re-enter this option for each static route needed.
-
Configure DNS prompts for the name of the DNS domain and the IP address of the first DNS server. When adding multiple DNS servers, press Enter to enter the next one. Press Enter twice to leave this option.
-
Reset Root Password is used to reset a lost or forgotten root password. Select this option and follow the prompts to set the password.
-
Reset Configuration to Defaults Caution! This option deletes all of the configuration settings made in the administrative GUI and is used to reset TrueNAS® back to defaults. Before selecting this option, make a full backup of all data and make sure all encryption keys and passphrases are known! After this option is selected, the configuration is reset to defaults and the system reboots. Storage ➞ Pools ➞ Import Pool can be used to re-import pools.
-
Shell starts a shell for running FreeBSD commands. To leave the shell, type exit.
-
Reboot reboots the system.
-
Shut Down shuts down the system.
The numbering and quantity of options on this menu can change due to software updates, service agreements, or other factors. Please carefully check the menu before selecting an option, and keep this in mind when writing local procedures.
During boot, TrueNAS automatically attempts to connect to a DHCP server from all live interfaces.
If it successfully receives an IP address, the address is displayed so it can be used to access the graphical user interface.
In the example shown above, TrueNAS is accessible at 10.0.0.102.
Some TrueNAS systems are set up without a monitor, making it challenging to determine which IP address has been assigned.
On networks that support Multicast DNS (mDNS), the hostname and domain can be entered into the address bar of a browser.
By default, this value is truenas.local.
If TrueNAS is not connected to a network with a DHCP server, use the console network configuration menu to manually configure the interface as shown here.
In this example, the TrueNAS system has one network interface, em0.
Enter an option from 1-12: 1
1) em0
Select an interface (q to quit): 1
Remove the current settings of this interface? (This causes a momentary disconnec
tion of the network.) (y/n) n
Configure interface for DHCP? (y/n) n
Configure IPv4? (y/n) y
Interface name:     (press enter, the name can be blank)
Several input formats are supported
Example 1 CIDR Notation:
    192.168.1.1/24
Example 2 IP and Netmask separate:
    IP: 192.168.1.1
    Netmask: 255.255.255.0, or /24 or 24
IPv4 Address: 192.168.1.108/24
Saving interface configuration: Ok
Configure IPv6? (y/n) n
Restarting network: ok

...

The web user interface is at
http://192.168.1.108

