Get a Quote     (408) 943-4100               TrueNAS Discord      VendOp_Icon_15x15px   Commercial Support Toggle between Light and Dark mode

Configuring a 3rd Party VPN service on TrueNAS

  3 minute read.

Last Modified 2022-12-07 14:12 -0500

TrueNAS includes the ability to run OpenVPN. This is a short tutorial to configure the OpenVPN client on TrueNAS 12.0.

Many VPN services are provided by 3rd parties that are unaffiliated with iXsystems. Please verify compatibility and pricing with your provider before integrating with TrueNAS.

Prerequisite: An OpenVPN server running with a similar configuration to these configuration file settings:

dev tun
persist-tun
persist-key
cipher AES-128-CBC
auth SHA512
tls-client
client
resolv-retry infinite
remote vpn.domain.org 1194 udp
lport 0
verify-x509-name "vpn.domain.org " name
auth-user-pass
remote-cert-tls server
comp-lzo adaptive

<ca>
-----BEGIN CERTIFICATE-----
MIIFgNGGD2bjNiJRSeJfugreDJkqhgh57w0BER8GFADBrMtMwEQYJYRRDEwuPcGVu
UW+LBmf6rq+7zqi4UH+f+zB566FOpEwwSjEGA1UETMBEAxMKT3BlblZQTi1DQTEL
...
9Iw5MNx9phXRlZjwMX0L3pteGKNUNJlmgQZSjI1ZNw7K3CZsIB47QFwalqkGFqGr
L0nObyspUxbcdqZVO/vbo3hFjNqVPjqkO4bP94G7D6w+W0ZHF6TXPmScvo2c9XVs
qnpyhawELAHtDy3keG1Hf/A+D6nTGMUb5+7E9Lw9WS+M1B6jrE
-----END CERTIFICATE-----
</ca>
<cert>
-----BEGIN CERTIFICATE-----
MIIGGTCCBAGgIBgAwIBABqhkiG9TANBgkw0BABKJZMQsFADwEQYDIEAZEwcGpPVy
iSFcYvI0l24r3zcIF836KryNpb1FKFaYzFszG3bCVSIp9LwVDrz1irMahq/W43Zb
...
D3kash6QiMfbVoxts2TEGMw18tz3ptf5R9QuGAILlfdZbVC9i0hj2wZvIMXZ+MDu
zwjY8zVQnfyxT9gc2rYwZTx057ldXZRqds7H2znKzIDZC9iu+UrQzCmq+s/YXUjy
KyLQVgOUIT6n2vyGuikiOvUczf1S8E8MBZtrvhM=
-----END CERTIFICATE-----
</cert>
<key>
-----BEGIN PRIVATE KEY-----
MIIJQgkqhkiG9IBADANBgw0BAASCQEFACSwgkoAwggEAAQCAoIC71VfhS9wOaSNJ
DCBpBfPtUc6iMzeezb0Dld1TGNmbujIAqOdmcnikE87lnQXA+w1ZIwKouFx2b7zr
...
6IEehZNciHpOU8zGE1RSNH1mqQKT6t0pK7hjGhlbZRsHmE8tGy7aBQi9z38pkunR
M7Dird0Be9Ua6r90+lDczcggzwzHTZ==
-----END PRIVATE KEY-----
</key>
key-direction 1
<tls-auth>
#
# 2048 bit OpenVPN static key
#
-----BEGIN OpenVPN Static key V1-----
31201c2093539a034a3549b8f109f7a0
...
c0224e25d9ed3d2b562e94bed507fcac
-----END OpenVPN Static key V1-----
</tls-auth>

Installing the Certificate Authority

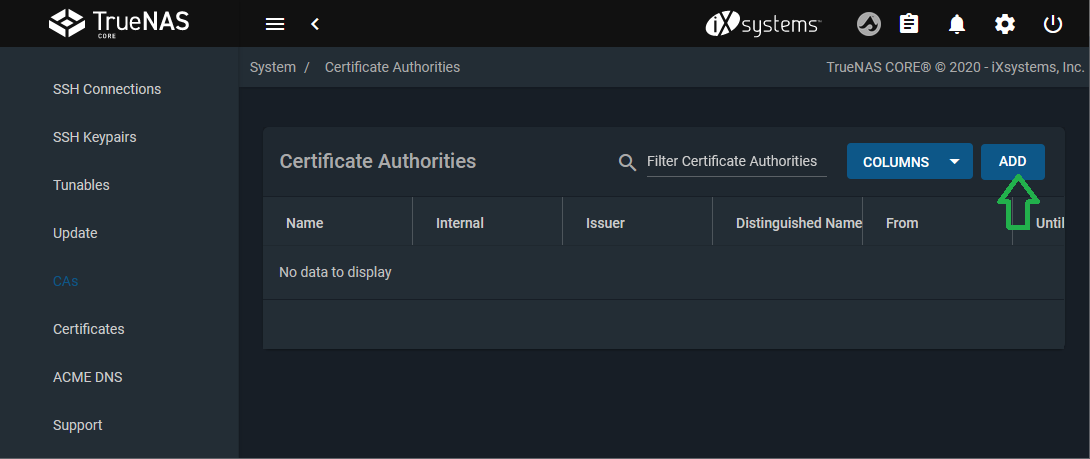
  1. Open System > CA.

  2. Add a new certificate authority.

    CertAuthorityAdd

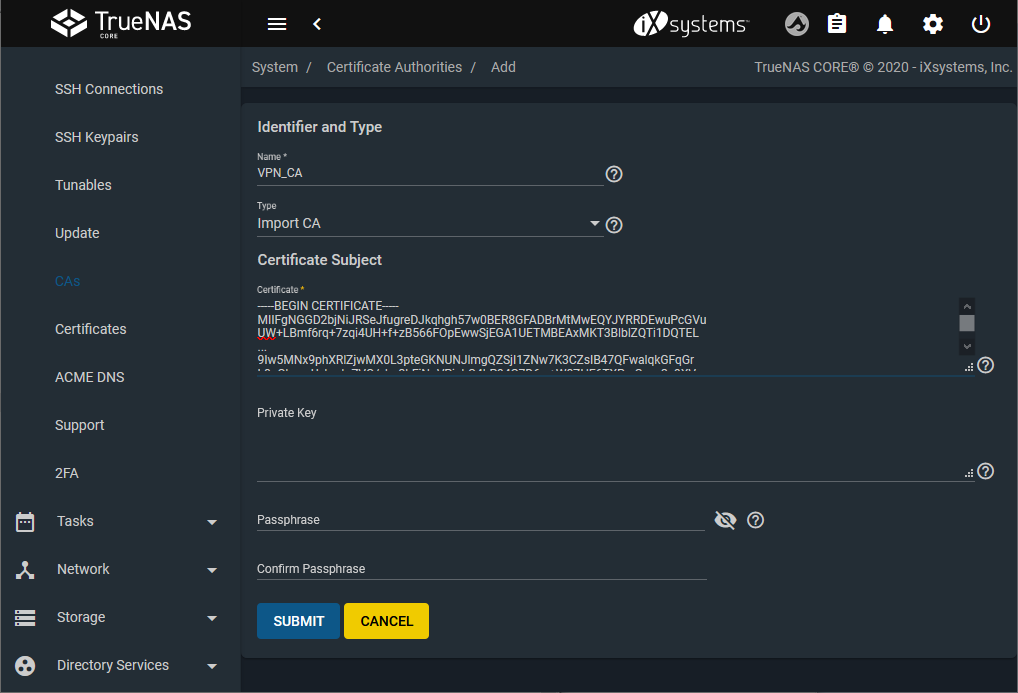
    Give it a name (example: VPN_CA) and select Import CA as the Type.
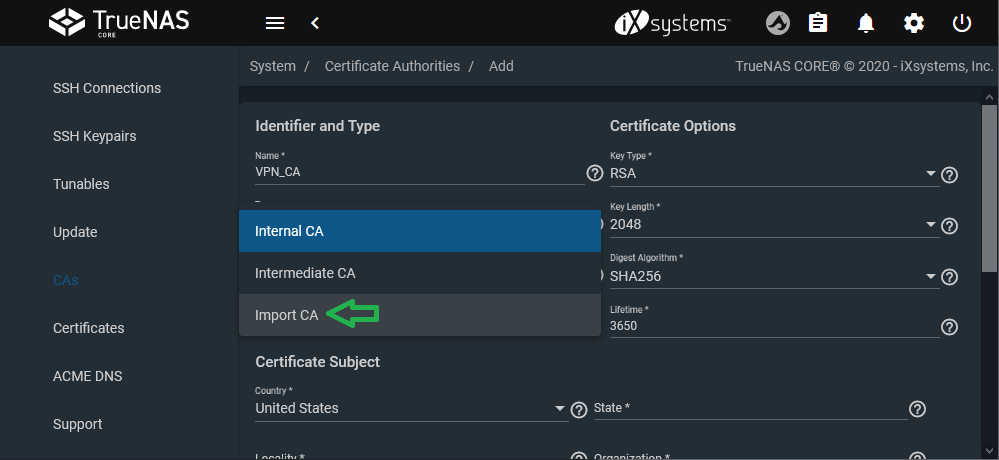
    CertAuthorityImportCA

  3. Copy and paste the certificate from the configuration file. The certificate is found between the tags and of the OpenVPN config file.
    CertAuthorityImportCACertificate

Installing the Certificate

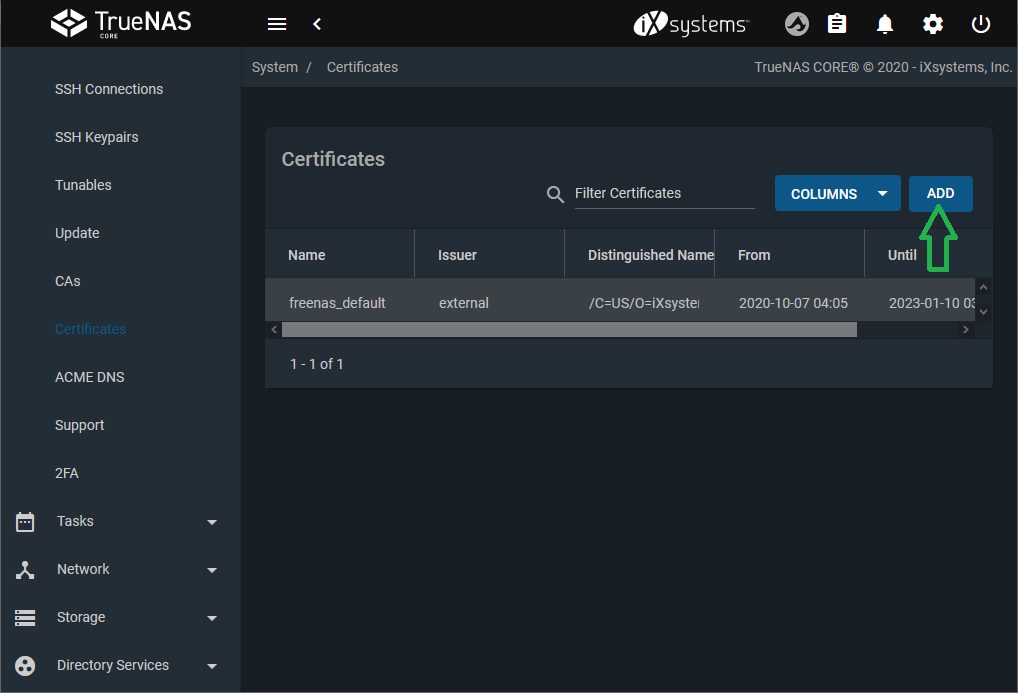
  1. Open System > Certificate.

  2. Add a certificate.

    CertificateAdd

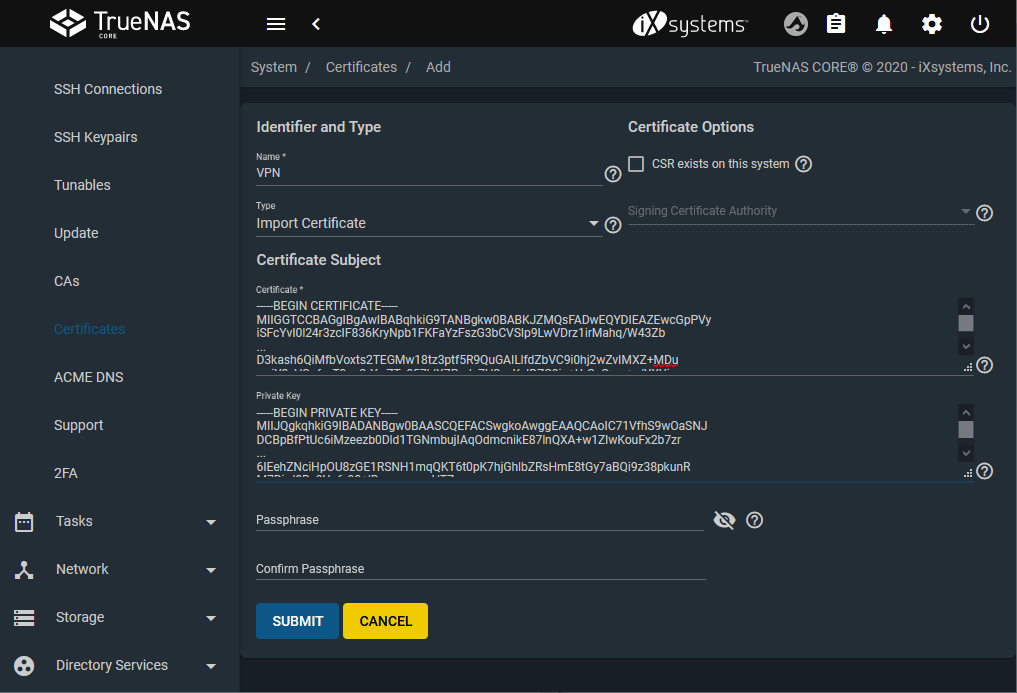
  3. Give it a name (example: VPN) and select Import Certificate as the Type.

  4. Copy and paste the certificate found in the OpenVPN config file between the tags and .

  5. Copy and paste the key between the tags and from the configuration file.
    CertificateAddDetails

Configure OpenVPN Service

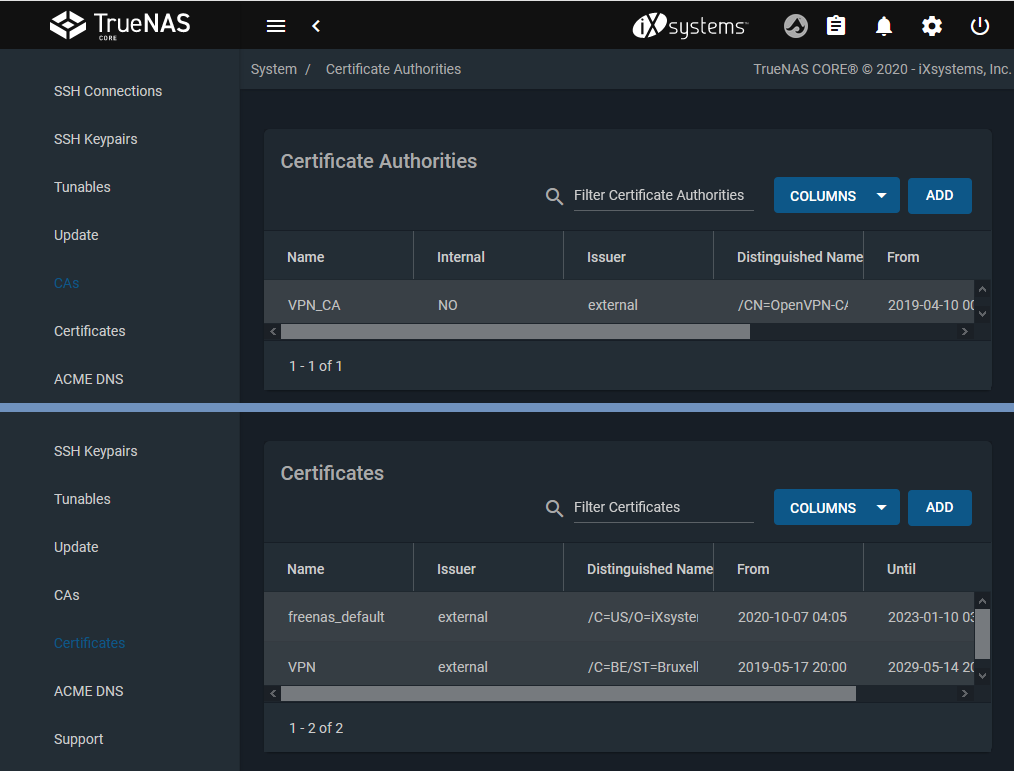
With a CA and Certificate created, we can configure the VPN connection next.
CertandCAAdded

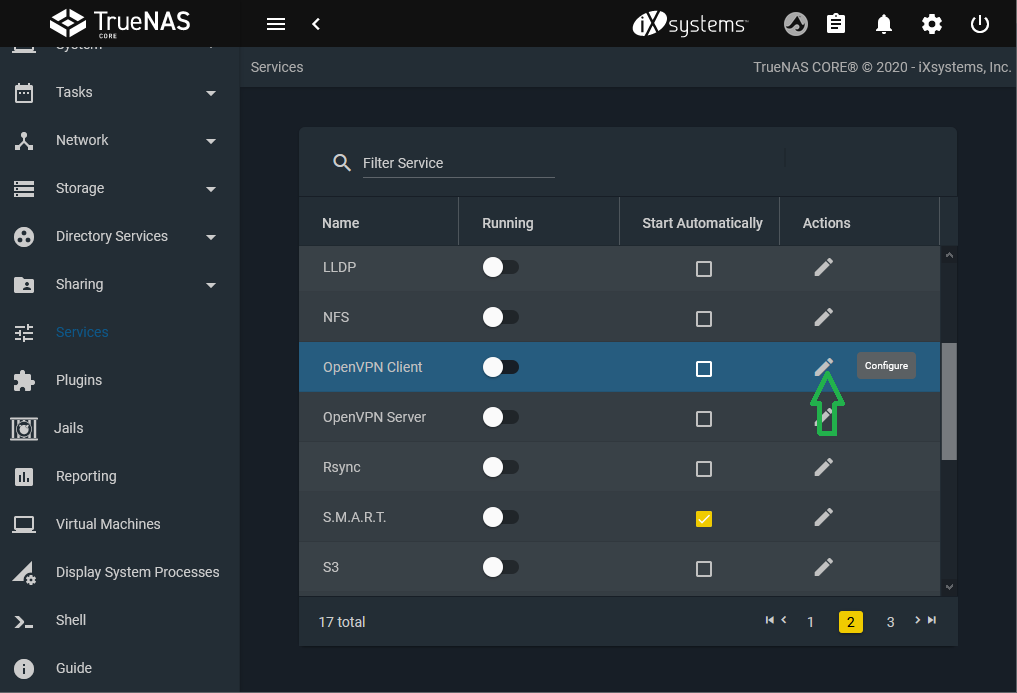
  1. Go to the Services page and find the OpenVPN Client entry.

  2. Click the   to configure the service.

    OpenVPNServiceEdit

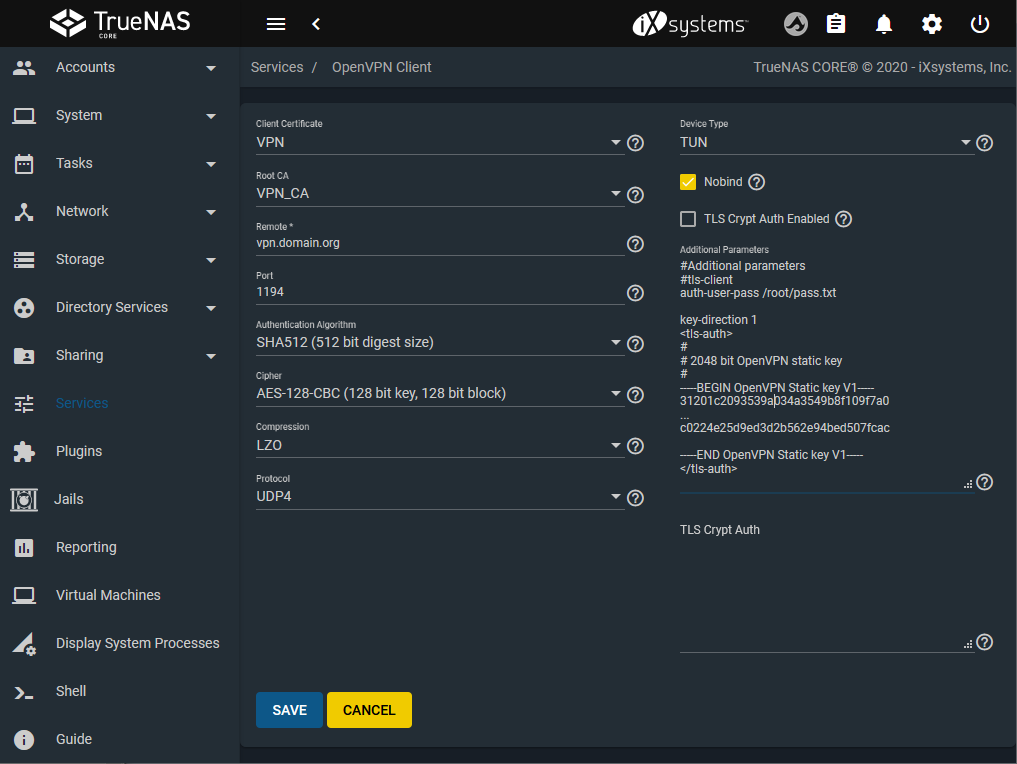
  3. Choose the certificate and Root CA previously installed.

  4. Port the remaining parameters found in the OpenVPN configuration file.

  5. Additional parameters stores options from the configuration files, like the TLS key for authentication or user login/password.
    OpenVPNServiceConfigure

Start the Service

  1. Go to the Services page and find the OpenVPN service.

  2. Toggle the service to start it. If desired, select the Start Automatically checkbox to have the service start each time the system boots.
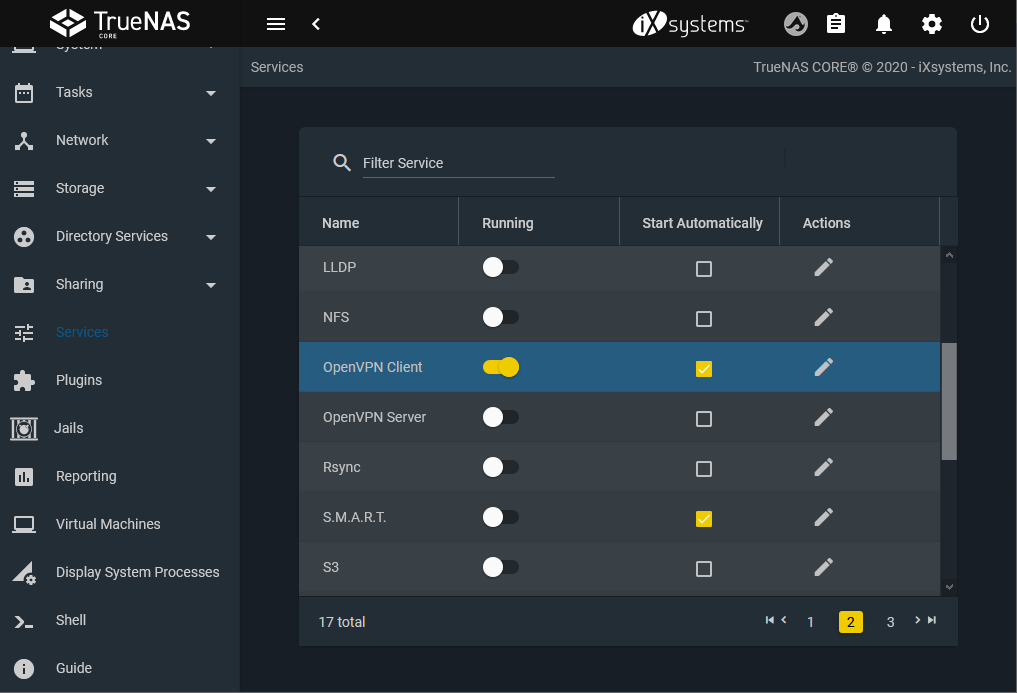
    OpenVPNServiceStart

  3. Test if the connection is working using curl ifconfig.me in a terminal. It returns the IP from the VPN connection and not from the local connection. Turn the OpenVPN client service on and off to see the difference.

Logs of the OpenVPN client are in /var/log/messages and /var/log/daemon.

Community Guides Articles